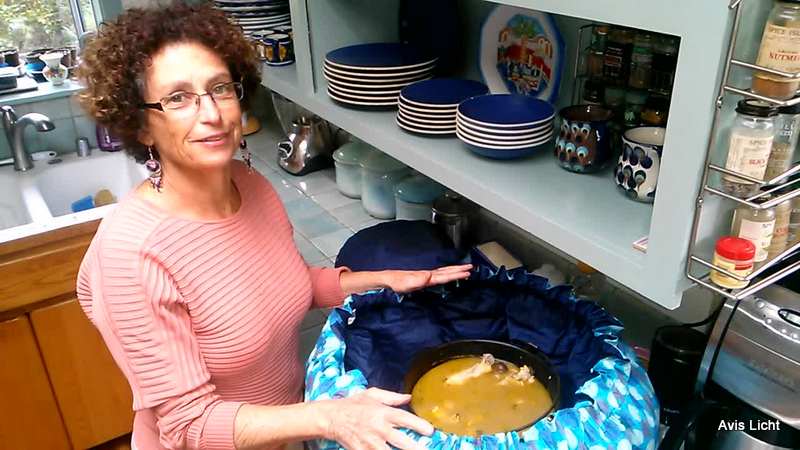
Mar 282014
 
Wonderbag

by Avis Licht  – The Wonderbag and wine and flowers, ready for dinner The slow cooker Wonderbag is a wonderful find. Originally invented by founder Sarah Collins in South Africa with the intention of conserving cooking energy in developing nations, this cordless, power-free, gas-free slow cooker might just change the way we slow-cook forever. For every Wonderbag purchased in the US, one is donated to a family in need in Africa. Families in developing countries who use Wonderbags save up to 30% of their income otherwise spent on fuel for wood stoves.

Here is an opportunity to reduce your energy use, help women and children in poor countries, cook healthy meals in very little time and a side benefit for me – no burnt pots!

This is my super simple recipe for chicken soup with fresh herbs.  You can buy this amazing Wonderbag from my store. I hope you enjoy it as much as I do.

Here is the series of photos of the making of the soup.  It’s actually cooking on the dining room table in the insulated bag!

Using fresh herbs from the garden

Sage, rosemary, tarragon, thyme, marjoram and parsley are the fresh herbs I used. Plus onion and garlic. Plus a little salt.

Chopped Herbs

Chop the fresh herbs and place in the pot with the broth.

Mushrooms

Any kind of mushrooms can be used. In the slow cooker they don’t get too soft.

Onions and garlic

Saute onions and garlic in olive oil or coconut oil. The smell is divine and gives a better flavor to the soup than used raw.

Add clied carrots to the saute.  rich in color and flavor
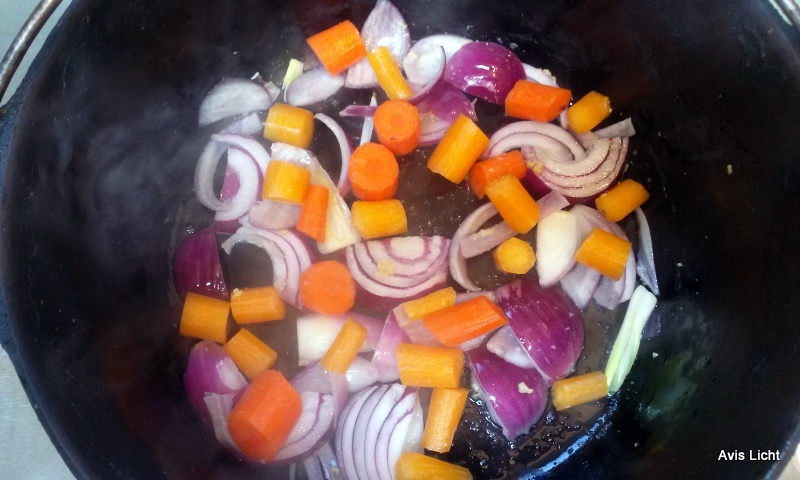
Add sliced carrots to the saute. rich in color and flavor


The chicken has been sauteed and then the broth added.

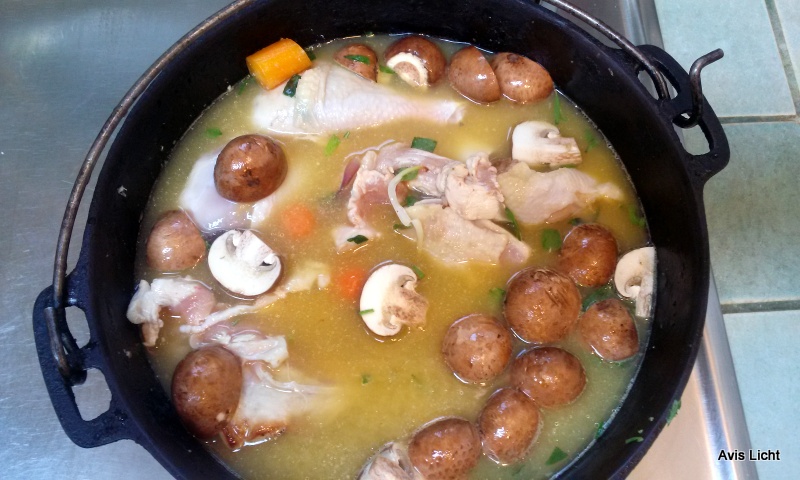
The chicken has been sauteed for about 5 minutes and then the broth added.

Pot with lid

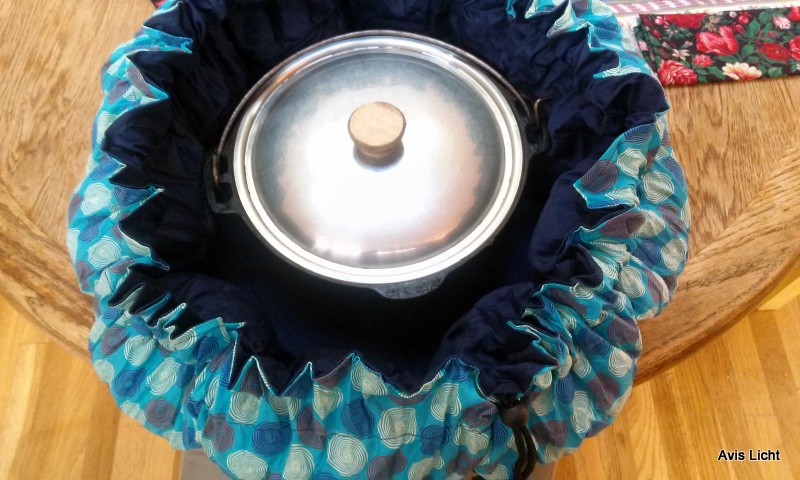
Bring soup to a boil then simmer 5 to 10 minutes. Put a close fitting lid on the pot and put into the bag.

Close it up tight

Close it up tight and leave for 5 – 9 hours. Don’t open and peek or you will let the heat out.

Open the top and check the soup. It's cooked and absolutely delicious.  Slow cooking   keeps the flavor.

Open the top and check the soup. It’s cooked and absolutely delicious. Slow cooking keeps the flavor.

A bottle of wine, some flowers, and fresh hot rolls, and you've got yourself a lovely dinner.

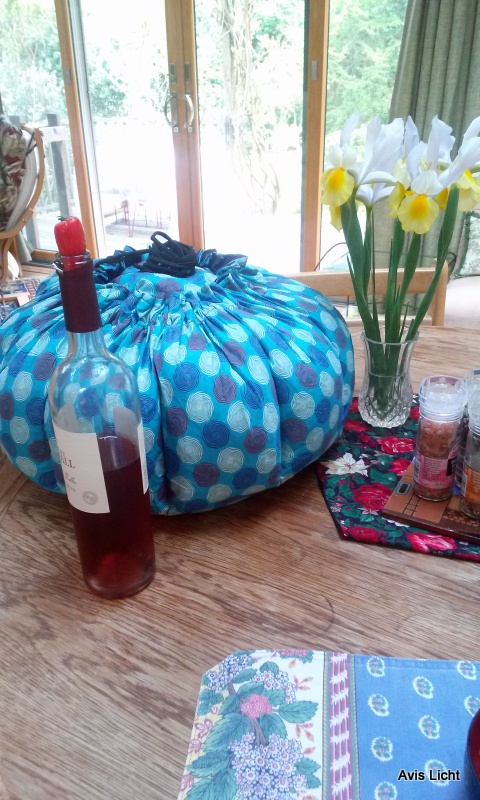
A bottle of wine, some flowers, and fresh hot rolls, and you’ve got yourself a lovely dinner.

Nov 192013
 
feijoa sellowiana

by Avis Licht –

feijoa sellowiana


Pineapple Guava

Fruit that ripens in the Fall


The Pineapple Guava is one of my favorite plants.  It serves many purposes in the edible garden. It’s an easy care, evergreen shrub that has edible flowers, edible fruits and somehow, the deer DON’T eat it.  It almost sounds to good to be true.

Where I live, deer eat almost all our plants, so having one that does all these good things is a real treasure.

Climate:The Pineapple guava grows in Zones 8 – 10.  What this really means is that it likes some cool weather, can go down to 10 deg. F, likes rain in the 30″ – 40″ range, and doesn’t like super hot daytime weather – not so good in the desert.

Soil: It’s adaptable to a wide range of soils, including acidic soil, but prefers a humus rich soil that is well drained.  Adding compost and not manure works for this plant.

Water: This is considered a drought tolerant plant, meaning it survives with relatively little water, but needs adequate water for good fruit production. During dry spells you should give it additional water.  In real terms, this means observe your plant. No matter what the books say, you always need to observe your plants in your own garden setting to see how they are faring and what they need. Everyone’s garden is different from the norm that all these books talk about.  You’ll always want and need to adjust requirements to your own situation.

by Avis Licht – If you need some great information on starting your Spring Garden, have a look at my new ebook, called The Spring Garden Made Easy

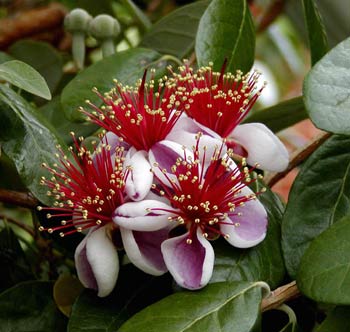
See these pretty pink petals? They are edible. Just gently pull them off and leave the rest of the flower so that it turns into fruit. The petals are really delicious. Take my word for it.

Sun: Full sun is best – but it can tolerate partial shade

Wind:The Pineapple guava makes a good windbreak. It can take some salt air, but I wouldn’t put it on the dunes as a first line wind break.

Care:  What I really love about this plant is that it needs so little care.  It just grows happily on its own. You can prune it for shape or let it alone. If you prune it back hard, you will lose some fruit production.

Pests: Almost none. Well, I haven’t seen any.

Be sure to check out my store of favorite reliable tools and implements for the garden.

Fruit and flowers:  The flowers which bloom late Spring are edible. The thick petals are spicy and are eaten fresh. The petals may be plucked without interfering with fruit set. The fruit ripens in late Fall, which is a great boon, since almost everything else in the garden is gone.  The fruit in the picture below, came from my garden on November 19th. They taste fresh and tangy. We eat them by scooping out the fruit with a spoon.  Or you can  cook them in puddings, pastry fillings, fritters, dumplings, fruit-sponge-cake, pies or tarts.

Scoop the fruit of the pineapple guava

Scoop the fruit of the pineapple guava out of the skin.

Don’t forget to check out my ebook: The Spring Garden Made Easy. It’s only $4.99 and gives a mountain of information.

Nov 052012
 
Delicious and nutritious

by Avis Licht

Delicious and nutritious

A quick way to use those end of season unripe green tomatoes.


At the end of the summer we’re always left with a bunch of unripe tomatoes.  The nights are cold, it rains, the plants start to rot.  It seems like such a shame to lose those tomatoes.  I was looking around the internet and found a number of yummy recipes for green tomatoes.

This recipe is a combination of several good ones. If you have left over sweet peppers you can use them and then add a little cayenne to the recipe to spice it up or down, just the way you like it.

Follow the pictures for each step and the recipe is written out at the bottom of the post.

Be sure to sign up for my blog in the subscription tab at the left.  Put in your email and you’ll receive a notice of my blogs the day I write them. Here’s one on growing tomatoes.

Get your ingredients together to mix with olive oil, salt and a dash of sugar in a medium bowl.


1. Preheat oven to 350 deg F. Chop green tomatoes, onions, peppers and garlic in chunks.

Mix ingredients in bowl before roasting

2. Toss tomatoes, onions, peppers, garlic with olive oil, salt and sugar in a bowl.

ready for roasting

3. Roast in 350 deg oven for about 30 minutes until soft.

roasted veggies

4. Chop your vegetables into small pieces.

Roasted and chopped

Chopped into small pieces

5.Put these veggies into the bowl with avocados, lime juice, salt, chopped cilantro and cumin. Mix well.

Delicious and nutritious

Combine ingredients and add sprig of parsley or cilantro.

There you have it.  40 minutes and you’ve got yourself an incredible dish. Make it spicy hot or not, as you like it. A great way to use those green tomatoes and you don’t even have to fry them!

Here it is:

  • 4 medium green tomatoes
  • 2 small red peppers (hot or not)
  • 1 onion – peeled and chunked
  • 3 – 4 cloves pressed garlic
  • 1 tablespoon olive oil
  • dash salt
  • sprinkle of sugar
  • 2 avocados
  • juice from a lime
  • a little more salt
  • 1/2 teaspoon  ground cumin
  • chopped cilantro – 1/4 cup

1. Preheat oven to 350 deg. Chop tomatoes, onion and pepper and toss with olive oil, salt and sugar.

2. Spread on lined baking tray. Roast for 30 – 35 minutes until softened.

3. Chop vegetables into small pieces.

4. In bowl, smash the avocados, salt, lime juice and mix with chopped vegetables.  Add the cilantro and cumin. Taste for flavor.

5. Enjoy as dip with chips or raw vegetables. My family took care of that bowl in no time.


Sep 212012
 
4 varieties from one tree
Lots of apples

We love our apples, but they come in all at once. Here are some ways to preserve those apples.

by Avis Licht

Fruit trees are one of the easiest ways to incorporate edible plants into an ornamental landscape.  They flower, they fruit, they’re relatively easy to take care of, they provide shade and beauty BUT they give all their fruit at one time.  One of the biggest complaints I have from my clients is that they don’t want to deal with all the fruit that falls.  Here are a few really easy ways to preserve your harvest.  It’s so worth it.


4 varieties from one tree

Choose apples carefully for storage: no cuts, bruises or bites.

1. The easiest: Cull your fruit for perfect apples that have no worms, cuts, bruises or bites.  These fruits will last for months in a cool, dark place. It’s important to make sure they are perfect or else they will start to rot and cause other apples to go bad.

2. Cut your apples and make applesauce: This is a good way to use “imperfect” fruit.  Cut your apples into slices and remove any bad parts.  I leave on the skins. I add a little fresh lemon juice which adds flavor and keeps the apples from turning brown.  In this batch I used a little Rose water for flavor.  Add a couple of tablespoons water and cook on simmer until the apples are chunky.  Store in the refrigerator up to a week. It is divine.

Cut apples for cooking

Use only a few tablespoons of water and put on simmer until cooked into a chunky sauce. Put in the refrigerator and it will last a week.


rose water

You can find this in Mediterranean food markets.


3. Freeze your fruit:  Put a little lemon juice into your bowl of cut fruit and stir it around.  Put fruit into ziploc bags and throw them into the freezer.  They’ll be ready for pie, sauce or smoothies any time. I wrote a post last Fall on freezing. You can read about it here.

4. Dehydrating fruit: This takes a little more time, but can offer some really tasty treats for later on. This dehydrator is not expensive and is small enough to store when not in use.

Dehydrator

A small scale dehydrator can be used for many fruits and vegetables.

I use fresh lemon juice and mix it with water.  Using a sharp knife I cut the apple in half and remove the core. Slice in 1/4″ layers. Laying the fruit in a shallow dish I put the fruit and lemon juice mixture together.  This keeps the fruit from turning dark and gives it a great flavor.

Juicing lemons

Juice some lemons and mix with a little water.

apples in lemon juice

Cut in 1/4 inch slices and dip in lemon juice


Lay out in trays and let the machine do its thing. Mine took overnight to get most of the moisture out.

Apples in dehydrating tray

Lay out sliced apples.

When done they should be flexible and leathery, but not watery.  Let them cool and put them in ziploc bags in the fridge for storage.  They are really sweet and make a delicious snack for kids.

dried apples

Check your dehydrator periodically to make sure the apples are drying evenly.

5. Share, share and share some more.  Bring your extra fruit and veggies to your local food bank.  They’ll love you and love the food.


Jun 012012
 

Save 15% off on $50 or more at Gardener’s Supply Company! Valid thru 6/28/12
[really-simple-share]

Thinning clumps of apples

This is a cluster of fruit from one node.

by Avis Licht- It’s always hard to throw away fruit, whether it’s on the tree or in the kitchen. But for best flavor, health and size of apples, be sure to thin them early in the season. You should do this for pears, peaches and plums also. Here’s how to do it.

1.Fruit is usually born in clusters of 2 – 6 fruit.  When they are small, around the size of a dime, cut out the smallest, damaged, misshapen, or wrinkled fruit.


2. Carefully prune out the fruit at the base of the stem. Use a sharp clipper or scissors.

Thinning the little apples

Clip carefully.


3.Be sure to leave one good apple.

Thin to one apple

Leave one apple per cluster.


That’s all there is to it.  Now you have to be patient until it’s time to harvest.

Here’s an easy, delicious recipe for apple crisp.

Going out into the garden to pick fruit is a really sweet thing to do.  You can be sure the fruit is fresh, organic, and ripe.  I needed something really quick to bring to a family gathering.  So I stepped out into the garden and picked a bowl of strawberries, a bowl of blackberries and some wonderfully tart apples.

Apples, blackberries and strawberries from the edible gardenBeautiful fruit right from the garden (click to enlarge)

All I had to do was rinse them off, slice the apples and put them in the pan.  If you want you can squeeze a little lemon juice over the apples.  I didn’t have any, and no harm was done. I confess to sprinkling a tiny bit of sugar over the top of the fruit.

The next step is the crumble for the top.  You can use a variety of ingredients.  I use 1/4 cup rolled oats, 1/4 cup  flour, both whole wheat and white, 1/4 cup  sugar mixed in with 1/4 cup butter and a pinch of salt. A little cinnamon and nutmeg goes well with this. Mix these ingredients over the top and voila, you’re ready to go.  Thirty minutes in 350 deg oven and you will have the best crisp you’ve ever tasted.

Special ingredients for the best apple crisp

Dec 012011
 
A very large harvest of squash

What would you do with all this food?

Well, I have to confess, I didn’t grow all these squash.  But it is quite an impressive pile. My own harvest was much more modest.

I  am not interested in spending time in a hot kitchen boiling and canning massive amounts of food. I definitely lean towards the quick and easy solutions. For preserving some of the  Fall harvest, freezing the food is a great solution. Freshly picked and quickly frozen food keeps most of its nutritive qualities.

My biggest harvests were butternut squash and apples, which both lend themselves to freezing which is so easy, and very safe for preserving.

Here’s how I do it:

butternut squash

Modest harvest still needs a place to live in the winter

Butternut Squash:

  • Wash the outside of the squash
  • Bake whole or cut in half, in 350 deg oven until you can put a knife easily into the squash- approximately 1 hour for large and 1/2 hour for small ones
  • Let the squash cool and peel off outer skin
  • Place into 1 quart Ziploc freezer bags
  • Label with name of food and date of freezing. (You probably want to use these in the next 6 – 8 months, not years)
  • Voila! Pull out and use as needed, for soup, baking or just heat up.
cut and frozen apples

Cut and packed in 1 quart bags with a little lemon juice


Apples:

  • Wash and cut into slices, removing the core as you cut
  • Drizzle lemon juice over slices so that they won’t get brown
  • Fill up Ziploc Freezer bags full, and try to get most of the air out when you close them
  • Take out bags as needed and use them in smoothies, apple pies, applesauce or just eat them frozen
  • Don’t forget to label and date them.

This really couldn’t be simpler. The food is easy to store and keeps its nutritive value. Check out these recipes in my blog for the best applesauce and apple crisp.

Nov 222011
 
Make applesauce with your extra apples from the garden

An abundance of apples allows us applesauce

To paraphrase the saying, When life gives you lemons, make lemonade, I say, When apples are falling all around your head, Make Applesauce! But not just any applesauce.  This recipe has a magic ingredient.

A way to spend a rainy afternoon

Cut your apples, put them straight in the pot with a few magic ingredients

It’s late Fall, cold and raining.  You could be sitting by the fire listening to music. Cutting apples.  It’s not a chore, but a wonderful way to spend a Sunday afternoon.

If you’ve got an apple tree and don’t know what to do with those extra apples,make applesauce with this easy recipe:

To make this easy wash the apples, but don’t peel them.

  • Take out the core
  • Cut off any bad spots
  • Put them in the pot
  • Add cinnamon, nutmeg, a little salt
  • NO Sugar necessary!
  • No water needed, the apples have plenty
  • ADD the magic ingredient: 1 Teaspoon  Rose Water per pot
  • Simmer on low heat about half an hour or until the apples are soft.
  • Eat warm with vanilla yogurt,
  • Or put in the fridge and it will last a couple of weeks.
Apples with Rose Water

Fill your pot, add cinnamon, nutmeg, salt and rose water

Applesauce Made Easy

A full pot of apples makes half a pot of applesauce

Super Simple, Super Delicious

Rose Water

Rose Water used sparingly gives an unusual and fine flavor to your cooking

Nov 012011
 
Butternut Squash

My rampant squash plants produced a good harvest of Butternut Squash

Winter squash, to be clear, is harvested in the winter, not planted in the winter. I have found that some people find this confusing. So now you know.  The best known varieties are Butternut, Acorn, Turban, and Banana. They are characterized by their hard skins as compared to summer squash like zucchini which have soft skins. You can store them in a cool place (about 55 deg) for most of the winter without problem. Unlike summer squash which will rot in a flash when you cannot bear to eat another zucchini dish.

Not only can you eat the meat of the squash, but also the seeds and the blossoms.

The easiest way to cook winter squash is to bake it in a 350 deg oven until soft.  Put a little salt and butter on it and eat it up.  But there are other ways too.

Buternut Squash

Harvested November 1, 2011

We love to eat butternut squash soup in the winter. It’s the perfect meal with a salad and a loaf of good bread. Here’s one of my favorite recipes for soup.  It’s so simple even my husband can make it.  And he has trouble boiling water.


Another great use for Squash: You can save the seeds from winter squash and dry them and roast them to eat.

Here’s a simple recipe for roasted pumpkin seeds, which works for all winter squash:

How to Roast Pumpkin Seeds

1.  Rinse pumpkin seeds under cold water and pick out the pulp and strings. (This is easiest just after you’ve removed the seeds from the pumpkin, before the pulp has dried.)

2.  Place the pumpkin seeds in a single layer on an oiled baking sheet, stirring to coat. If you prefer, omit the oil and coat with non-stick cooking spray.

3.  Sprinkle with salt and bake at 325 degrees F until toasted, about 25 minutes, checking and stirring after 10 minutes.

4.   Let cool and store in an air-tight container

You can also season them with sweet or savory spices like cinnamon or garlic salt. (Although not these two together, please.)

Squash blossom

Even in late Fall we can find squash blossoms to eat

Last but certainly not least you use squash blossoms  raw or cooked. Deep fried, in pizza, baked or in salads. Amaze and delight your friends by serving them something they’ve never seen before.

Here is a link to five fantastic recipes for using squash blossoms.

Give them a try.


© 2011-2024 Edible Landscaping Made Easy With Avis Licht All Rights Reserved