Jan 202012
 
Raised beds


By Avis Licht

Raised beds have many advantages.  They  provide better drainage,  better access, better plant growth and reduced soil compaction.  There are many ways to build a raised bed.  Let’s  see what would be best for your garden.

Raised beds

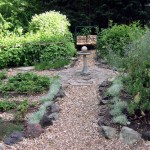
Double dug beds are raised and need no edging

The Simplest Raised Beds

These don’t need any built up edge, they only need to be double dug.

This act of digging and moving the soil aerates it and raises it up. Here’s a more detailed explanation.  This is especially effective when opening up the soil for the first time.    By creating “beds” instead of rows, you leave paths for walking and you never step on the bed.  This prevents compaction and allows water and air to penetrate the soil, making for healthier roots. It also lets you plant in a more intensive manner.

Double digging is hard work, but doesn’t need to be done every season. In another post I’ll show you the many reasons for using this method, and different ways you can incorporate  fertility.

Stone for raised beds

Raised beds using stone for both low and tall walls

Stone Raised Beds

Stone lasts forever, and looks beautiful.  It is also easy to create  curving lines in the garden.

As you can see in the photo above, you can use stone to edge your beds, it defines the line and creates a clear path.You can use it to build a wall, which is especially effective on a slope. In this garden, the curved bed was built to 2 ft high, which helps the owner who has back issues.  We  used the opportunity of the height of the bed to bring in some good organic topsoil.

If you bring in soil, be sure to loosen up the bottom of the bed.  It doesn’t help to bring in good topsoil if you don’t have good drainage.

Cost is a factor in deciding whether or not to use stone.  It can be expensive if you have to buy it, and  it takes time to install it.

buildiing curves with stone is easy

This curved bed looks good even when the garden is dormant

Wood Raised Beds

Wood is commonly used for building raised beds in the vegetable garden. Use recycled wood if possible.  Buying redwood or cedar has many implications to the environment.  If you are only raising the beds a few inches, I don’t think wood is worth the effort or the cost.

If you do use wood, be sure not to use pressure treated wood. This includes old railroad ties. The chemicals in this wood are hazardous to your health and the environment.  This article covers the pros and cons of using wood.

Bamboo raised bed

Bamboo or willow can make a great raised bed, especially if you are growing it yourself

You can even find recycled plastic for raised beds. Kits with all the materials you need can make the project simple.  Gardener’s Supply carries all kinds of raised bed kits.


Raised beds with stone from the site

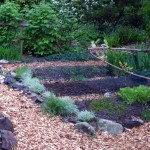
The raised bed just planted


When deciding whether to use raised beds in your edible landscape consider your site, soil, resources and aesthetics.


Vegetable garden

The raised bed a year later-- vegetables and flowers

Jan 022012
 
After sheet mulching - beauty and bounty

by Avis Licht

After sheet mulching - beauty and bounty

It’s possible to have a backyard that is both productive and good looking

Winter is a good time to think about designing, changing or tweaking your garden.

Instead of being knee deep in garden projects, you can sit back and take the time to consider changes to your garden. Your changes can be big or small, but make sure they fit into the grand scheme.

Curving path on steep hill

Using plants and curving path for hillside erosion control

Your parameters will be:

1. Your site: Whatever you do has to work within the givens of your site. These include your climate, soil, sun/shade, slope, existing plantings that you won’t change, buildings and hardscape: paths, stairs, retaining walls, driveways and fences.

Welcoming entry

A well laid, flagstone path, sturdy yet still informal

2. Your finances: New landscaping can be exceedingly  expensive or fantastically frugal – it depends on how much of the work you do yourself, and whether you use new, used or recycled materials.

Redwood Picket Gate

Gate and Arbor from recycled materials

3. Your desires: What you need and what you want may not always coincide, but at least you can consider them and prioritize them. Not everything needs to be done at once.  Have a plan, then build it over time as you can afford it.

4. The sustainability factor: So hold on here, I have a couple of different definitions of sustainable. Hear me out. On a personal level, your garden is only as sustainable as you can take care of it.  If it takes more work than you can keep up with, then it is NOT sustainable on a personal level.  If it takes more money than you can afford, that too is not sustainable. If you put in plants that require more water than you have available both from nature or from finances, that won’t work either. Your personal input has to coincide with what you can afford on an ongoing basis.

On a more global level, sustainability is about the energy and materials you use to build, maintain and grow your garden. Whether it means reusing the wood from your old fence to build a new one, or using permeable pavers instead of concrete for patios and paths, every time you make a decision on what you will use in your yard, be sure to consider the larger impacts.

Brick step with Wood Edge

Using recycled materials we built a brick step

These bricks were taken from an old job and used by me at my own home.  You don’t have to give up on beauty when you reuse or recycle materials.

Tomorrow I’ll talk about specific designs for edible landscapes for small yards.


Nov 102011
 
Recycled Brick and wood go together well

Recycled brick steps with wood edge on a wood deck


When adding new structures to your garden such as steps, paths, trellises and gates be sure to consider using recycled materials. 

For the steps above I used bricks that someone else didn’t want anymore and that I had been storing for some “future” project.

We did a small remodel  in the living room, putting in sliding doors. This then required some steps down to the existing deck.  My first thought was to use the same wood as the deck.   But  I had the bricks and we needed something right away.We laid the bricks in front of the door on the wood deck.  They looked good, but posed two problems.  Though bricks are heavy, they tended to slip a little and were not entirely safe.  The second problem was bricks on wood held in moisture and would rot the deck.

brick step in process

Wood framing and metal shelf keep the steps dry and in place

Solutions to these problems were straight forward. We built a wood frame around the bricks with 2 x 4 Redwood and laid an old wire shelf underneath for drainage.  The wire shelf had just enough height to keep the bricks off the wood, but not so much as to change the height of the steps.

The final decision on the steps was an aesthetic one.  How many different materials can you use in one area and have it look unified? Using recycled materials is great, but throwing whatever you have at a project won’t work if it doesn’t look good.

Keep your design simple and it can look very elegant. Look around with an open mind and you might surprise yourself with what materials are available.

Mixed media works for me - Brick and Wood

Brick steps with wood edging look good on a wood deck

Tomorrow I’ll show you how I used someone’s throw away fence pickets to build a gate and a railing.

Nov 072011


Retaining walls

The hill came down, the walls went up


Before the rains come crashing down, take a good look around your property.  It’s especially important if you are on a hill or have slopes around you.  When water picks up speed it can really create havoc.  Take a look at this hillside. After a number of rainy days, the whole hillside came down into the driveway.  Fortunately, no person and no cars were there when the soil came down.

In an effort to get more light in the property the owners cut down many trees.  The result, light came down and so did the hillside.  They should have made sure the ground was planted and drainage was put in place.  To do it after the soil erodes is much more expensive. In addition to cutting back the hill and putting in retaining walls, we also put drain pipe behind the walls, at the top of the hill and at the bottom.  Water has to go somewhere!  Take a look.

Erosion control for steep hills may mean building retaining walls

Cement block wall at the bottom and wood retaining walls will hold back this hill

Construction of the retaining wall

Retaining wall in process

There's still too much soil, and erosion can be a problem

Cement block wall is not high enough, and soil needs to be removed

After the walls are built, it is important to plant for soil coverage.  I use seeds for immediate coverage and plants for long term coverage.  At the top of the hill we put in a swale to redirect the water away from the main walls. We covered it with erosion control blankets.  They are both 100% biodegradable, but they are slightly different. One is thicker and made of coconut fiber and the other has straw put between cotton netting. The thick mat is better for stronger erosion control and the straw allows better germination of seeds.

Two types of erosion control blankets - coconut and straw

The blanket on the left has straw and the blanket on the right is coconut fiber.

Swale

A long swale covered with netting and also planted with seed

For quick germination I used rye grass, Dutch white clover, vetch and California wildflower mix, with extra California poppies. We were lucky with early October rains that helped with excellent germination.  If you don’t expect rain, you should water the seeds to take advantage of warmer weather in the early Fall.  Once the winter rains come it gets too cold for most seeds to germinate.

Erosion control seed mix

Rye grass, Dutch white clover, Vetch and Wildflowers

Seeds germinating through straw mulch

Straw mulch holds the soil in place and protects the seed


Tomorrow I’ll talk about other simple erosion control  methods.

Curving path on steep hill

Using plants and curving path for hillside erosion control


© 2011-2024 Edible Landscaping Made Easy With Avis Licht All Rights Reserved