Feb 032014
 

by Avis Licht –

Paths save the soil

Paths create a line of view and protect the soil from compaction.

Here is one ridiculously simple way to save your garden from compaction, drought and confusion.

Create paths exactly where you want people to walk. That’s it. That’s the ridiculously simple and effective way to save water, improve your soil and avoid confusion.

Compaction makes it difficult for water to penetrate, for air to infiltrate and for roots to grow in a healthy manner. Different soil types react differently to being walked on.

Sandy soil has the largest particles among the different soil types. It’s dry and gritty to the touch, and because the particles have huge spaces between them, it can’t hold on to water and does not compact so easily. So you folks near the beach can worry less about this. The rest of you, listen up.

Silty soil has much smaller particles than sandy soil so it’s smooth to the touch. When moistened, it’s soapy slick. When you roll it between your fingers, dirt is left on your skin.

Silty soil can also easily compact. It can become poorly aerated, too.

Clay soil has the smallest particles among the three so it has good water storage qualities. It’s sticky to the touch when wet, but smooth when dry. Due to the tiny size of its particles and its tendency to settle together, little air passes through its spaces. This type of soil is also prone to major compaction.

Just the one action of NOT walking on your soil can help immensely. Reducing compaction allows water to penetrate, saving water; increases root growth, creating conditions for healthier plants, reduces confusion by showing people where to walk.

By building paths, you tell your guests, and yourself exactly where to walk, thereby reducing all confusion. (See first sentence).

Here’s a post I wrote on how to make a simple, safe and sturdy path. The Well Made Path.

Raised beds are a great way to keep your soil from being stepped on continuously.Click here to see a variety of Raised Beds.

Mulch, stones, brick, wood rounds set in a clearly marked path will all work to reduce compacted soils.

This image comes from the University of Kentucky; 

They write: “Compaction results when soil particles are pressed together, reducing pore space and aeration.  The damage to the soil structure reduces the soil’s ability to hold and conduct water, nutrients, and oxygen.  Rate of water infiltration is decreased and more water is lost to runoff.  Other effects of compaction include decreased organic matter, reduced microbial activity, poor drainage, increased erosion, and nutrient leaching.

These undesirable effects on the soil directly affect plant growth.  Roots have increased difficulty when penetrating the soil which often results in reduced root growth and reduced ability to take up water and nutrients.  Compacted soils can slow forage establishment, cause short and stunted plants, decrease drought tolerance, and reduce overall yields.  Severely compacted areas often have sparse growth or are bare due to these problems.”

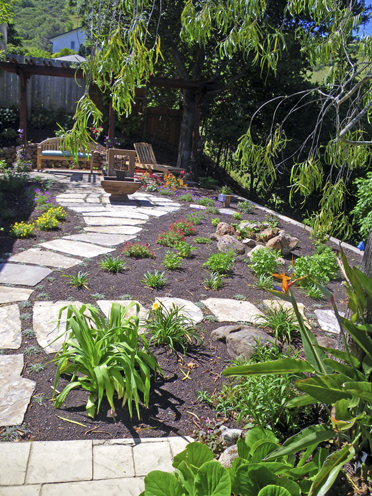
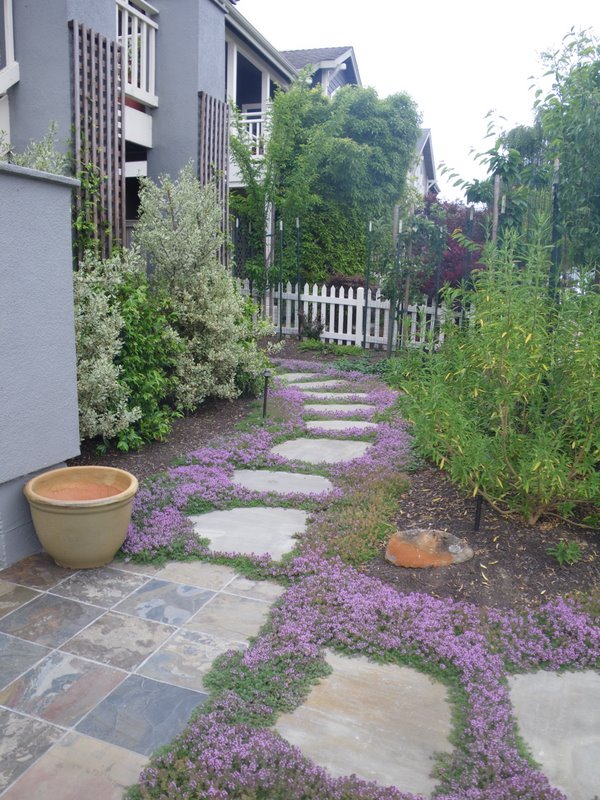
Even a simple stone path, planted with ground cover is beautiful and effective. Paths: you don’t want to live without them.

Nov 122013
 

by Avis Licht

Spring Garden Made Easy

A cover crop is an area of planting that is sown for the purpose of improving the soil and keeping the ground “covered” to prevent erosion.

The right plant can:

  • Increase the  organic matter content of the soil
  • Increase the availability of nutrients
  • Improve the soil’s tilth, which is the texture of the soil
  • Reduce weeds by choking out undesirable plants
  • Reduce soil pests
  • Enhance the soil’s biological activity.

Fava beans are one of my favorite cover crops. You can sow them late in the Fall even in cold weather.

Fava beans germinate quickly and grow even faster.  You can use the tops for compost, eat the beans, and when you’re done with the plants you can leave the roots in the ground.  Fava beans  will have put more nitrogen into the soil than it takes out.  I mean, this is a plant that keeps on giving.

It’s not a good idea to  leave any areas of your garden bare in the winter. Rain will compact the soil. The ground is subject to erosion and leaching of nutrients when nothing is growing. I sowed my Fava Beans in November and 3 weeks later they were over 8 inches tall. The moral here is better late than never.

In the Spring, when you’re ready to plant your veggies, you can cut down the fava beans even if you don’t harvest the bean for eating.  It will make an excellent addition to your compost pile and leave the soil in better condition.

Once we’ve got our garden planted, we can sit back and welcome winter back again.

And while you’re relaxing around the fire, it’s time to start perusing those beautiful seed and plant catalogs for Spring and even get a leg up on your spring garden with my ebook, The Spring Garden Made Easy.

Spring Garden Made Easy


To help you get started on your Spring Garden, there’s plenty of good advice in my ebook: The Spring Garden Made Easy. It’s only $4.99. If you’ve gotten useful information from my blog,here’s a way to keep me going. Thanks for reading. Be sure to leave a comment and let me know if you have any questions or suggestions. I love to hear from you

Bell beans grow all winter long

Bell beans grow all winter long

The summer vegetables are gone and it's ready for fava beans as a cover crop

The summer vegetables are gone and it’s ready for fava beans as a cover crop

Dec 032012
 

by Avis Licht  

Erosion caused by overgrazing of cattle 

I’m sitting in my office, looking out the window at the pouring rain.  A huge winter storm has descended on us.  For the water we are grateful. We just need to make sure that it  doesn’t all run off  and erode our precious soil. Erosion of topsoil is one of those strangely ignored problems that can create huge problems, but can be addressed with straightforward solutions.

In their book, Topsoil and Civilization, Vernon Carter and Tom Dale, make the convincing case that our misuse of topsoil is directly related to the downfall of civilizations. It takes 500 years to form 1 inch of topsoil and with unsafe soil practices this important layer can be washed away in minutes. They write, “Civilized man was nearly always able to become master of his environment temporarily.  His chief troubles came from delusions that his temporary mastership was permanent.  He thought of himself as “master of the world” while failing to understand fully the laws of nature.”

Topsoil supports life.  Through thousands of years topsoil was formed as organic matter decayed and was deposited in layers.  For 350 million years the quality and quantity of soil and life increased. With the advent of civilized man, soil building processes was reversed in most places.

A tiny fragment of the land area on the earth represents the soil that we depend on for the world’s food supply.  This small fragment competes with all the other needs – housing, cities, schools, land fills, etc. It is up to each one of  us to take care of, protect and enhance our own topsoil.

THINGS YOU CAN DO TO PROTECT YOUR SOIL:

1. Plant to cover your soil. In vegetable gardens use cover crops in the winter where you don’t have vegetables growing.

Plants cover concrete wall

Once the plants are in you can barely see the retaining wall

2. Judicious use of wood and stone to form retaining walls can make a big difference in stopping erosion.

Stone for raised beds

Raised beds using stone for both low and tall walls

3. Create ditches and/or swales to slow and redirect water runoff.

Swale, at the top of the hill, redirects runoff, and is also covered with biodegradable fabric that has seed sown in it.

Check out these photographs of  waterfalls in my own garden after 10 inches of rain!

[portfolio_slideshow include=”2104,2109,2110″]


Oct 192012
 
lettuce

by Avis Licht

In Northern California where I live, we can grow many crops over the winter. I’m getting my seedlings in for the Fall and Winter garden.  In this slide show I’m planting lettuce seedlings.  I’ll show you how to gently pry to roots apart and plant them to reduce shock.

Getting the soil ready is an important part of growing healthy plants. In my book The Spring Garden Made Easy, I set forth a simple, straightforward guide to planting that you can use in any season. Check it out!

[portfolio_slideshow]

Using a group of seedlings

Take a clump of seedlings

Gently break apart in half

Gently break apart in half

Open hole and let roots dangle straight down into opening

Open hole and let roots dangle straight down into opening

Firm in gently around the leaves

Firm in gently around the leaves

Water in gently to settle the roots and get the plants going.

Water in gently to settle the roots and get the plants going.

After they are planted you need to make sure they don’t dry out. Check the soil for moisture if it doesn’t rain. Just looking at the surface of the soil doesn’t tell you if it’s moist underneath.  Check with a trowel down a few inches.  If it’s dry at 2 inches or if the plants are wilting, be sure to water them.

You can find out more about extending your season in this article on row covers.

Feb 082012
 
New plantings in the spring garden


by Avis Licht  –

New plantings in the spring garden

Pots near the kitchen are great for herbs


Early Spring is the time for gardeners to get ready for their early vegetable garden.Here are a few things to think about to help you get started.

SITE

1. Pick a place near the house for your vegetable garden so that you will see it everyday. Out of site is out mind for most people. Visit your garden for at least 10 minutes a day and you will keep up with the maintenance and see how plants are doing.  You’ll discover if there are any problems before it’s too late.

2. Pick a sunny site that gets at least 6 hours of sun. Most vegetables need this amount to grow well.

3. Make sure there’s water near by for irrigating.

SIZE

Raised bed gardening

Easy to reach, easy to plant, easy harvest, it's a raised bed

1. Keep it Small and Simple, as the saying goes. First time gardeners should start small and be successful.  Graduate to a larger plot next year. A couple of beds, 3 ft x 6 ft, will give plenty of delicious vegetables.

2. Consider growing your herbs in pots near the kitchen where they are easy to harvest.

SOIL

1.Whatever kind of soil you  have, be sure to loosen it and add compost. By aerating your soil and adding humus you will increase oxygen, nutrients and drainage, which will help your plants grow. You can loosen your soil by digging, rototilling or bringing in topsoil and adding it to a raised bed.

2. Check your soil for drainage. If you see standing water on the surface, or if you dig a hole and there is water in the bottom, you need to make some adjustments. Vegetables don’t like to grow in standing water.  There are several ways to improve drainage.  Dig into the hard soil with a digging fork and loosen it. Raised beds provide better drainage. You can also dig a small ditch and direct it away from the growing area. This will help move water away and improve your soil.

3. Create paths for walking in the garden.  Every time you walk on the soil you compact it. This prevents air and water from entering. Just by using paths and not walking on the beds you will increase the health of your soil and your plants.

CHOOSE YOUR VEGETABLES WISELY

Choose your plants wisely

Early spring you can sow and plant broccoli, cabbage, cauliflower

1. Choose your favorite foods to grow. Zucchinis are easy to grow, but if you don’t like them, don’t grow them! Peas, carrots, beans and tomatoes taste better when harvested ripe and fresh. They are easy to grow and harvest.

2. Choose what grows best in your climate and your site. If you’re in the cool Northwest  U.S. you might want to pass up on the hot peppers and melons.  Cooler climates are good for broccoli, cabbage, lettuce, spinach, chard and kale. If you’re in a hot climate go for the peppers, melons, squash and eggplant.

3. Look for micro climates in your garden to give you more opportunities to grow plants that you might otherwise leave out. A micro climate will be a place that is sunnier ( on the south side of the house), cooler (on the north side), calmer (on the lea side of a fence or windbreak), shadier (under a tree) and so on. Check out your garden for mini climates.

RESOURCES

1.Your local nurseries will be carrying plants appropriate for your climate.  Ask them questions.

2. For the Western United States, consult Sunset Western Gardening Book.  It is amazing in it’s information for so many regions in the West.

3. Seed Catalogs and Online companies. Check out my list in the resource page.

Raised beds

Double dug beds are raised and need no edging


Oct 102011
 
Rain brings nitrogen into the soil

Soft light rain through our oak trees. (click to enlarge)

 In California we have a long, dry summer. When the rains come in the Fall it is truly time for rejoicing. But, the rain isn’t just water, it’s also incredibly useful fertilizer. You may have noticed that your plants really perk up after a rain. Much more so than just using your irrigation system.

Rain makes plants rejoice

Lettuce seedling in the rain

The largest single source of nitrogen is in the atmosphere.  However, plants are unable to use nitrogen as it exists in the atmosphere. Nitrogen from the air (N2) enters the nitrogen cycle through several unique types of microorganisms that can convert N2 gas to inorganic forms usable by plants. Some of these microorganisms live in the soil, while others live in nodules of roots of certain plants. Rain droplets pick up nitrogen in the air and through mineralization increase the available nitrogen in the soil in a form that the plants can readily use.

All that just to say, we really love the rain.  Of course, nature is much more complicated than that. Pollution in the air can cause acid rain, which is not a good thing for your plants.  You can read more about nitrogen here.

The  process which converts  atmospheric nitrogen into plant available nitrogen needs moist soil and warm temperatures.  In order for the rain to penetrate into your soil you need to make sure your soil is loose, not compacted and preferably with mulch or compost added to the surface.

Plant seedlings in the Fall for harvest over the winter

Kale seedling in the rain

Healthy soils, make healthy  plants, make healthy people.

Sep 272011
 
Inside a rolling composter with worms

Inside the composter, worms eat the food and make soil

Composting is one of my favorite subjects. How many ways can you take garbage and turn it into gold.  The only way I know is by composting your kitchen and yard waste and getting Garden Gold as the result.

There are few additions to the garden that are as useful as compost.  You can’t use too much of it, it won’t burn your plants like too much nitrogen and it increases the entire health of the soil as well as the plants. It is easy to put your kitchen wastes and some dried leaves in the bin and let the worms do their thing.

Small enclosed composter

This small composter keeps out all critters and fits on a deck or small area easily

In the picture on the left, you put the food in the little trap door. Mix your wet garbage like food scraps with dry matter, like leaves, weeds and  sawdust at the rate of 1 part wet to 4 parts dry. Introduce worms into the bin, either by putting some topsoil from your garden into it, or buying some earthworms from the nursery. You can also find that a little manure added will get your compost going fast.

The difference between a “hot” compost pile and a “cold” pile is the rate of decomposition and the heat generated by the breakdown of nutrients.  In the bin on the left, regular additions of kitchen waste keep the pile cool, and worms find that they like this atmosphere just fine. Piles that get too hot do not have worms. Both kinds of composters work. It is more a matter of how you use your pile that decides which way it goes, hot or cold.

Big Mother

Happy worms can get big

Worms in the compost

Worms in the compost


This set of photos shows a partial break down of the food. Worms did all the work.

From this point on you can put the compost into the soil around your plants.  You’ll also be introducing more worms into the soil which is a spectacular thing to do.

There is lots more to know and learn about composting and worms, but I really just want you to get started. Here is an interesting article that will tell you more on worms. Never throw another banana peel away. Your edible landscape will be healthier and produce better tasting food using this free garden gold.

© 2011-2024 Edible Landscaping Made Easy With Avis Licht All Rights Reserved