vegetables | Edible Landscaping Made Easy With Avis Licht - Part 3

Mar 232012
 
Deer fence with copper art


Deer fence with copper art

A beautiful open fence keeps out the deer and lets in the sunlight

by Avis Licht – Designing a front yard can be a little tricky. Designing it so that it is also a productive food garden makes it even more challenging. What makes an edible landscape work, is that not only does one get food from it, but it must also be lovely to look at in all seasons.  Using a few basic  design tenants and some good gardening sense will help you get started.

1. Always note your sun/shadow in all seasons.  This can change drastically between summer and winter. Be sure to place your shade plants in shady spots, and your sun loving plants where they will find the light. In the garden in these photos, the house casts a large shadow – almost completely in winter, but only partially in summer.

Since this was the only open area for my client’s vegetables, we noted the best sun areas during the main growing season between April and October.

Finding the sun/shadow line

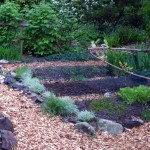
Note your sun/shadow in the main growing season. This photo is the new garden. (click to enlarge)

The old garden fence and site.

This is what the front yard looked like before we renewed it. (click to enlarge)


Don’t forget to look at my book on The Spring Garden Made Easy.

2.If you need a fence, be sure it looks good, lets the light into the garden and keeps the deer and other critters out. Wood fences can look good, but can also create shadows that prevent plants from getting enough light.

A simple post and wire fence that looks good

A good looking wire fence lets the light in and keeps the neighbor’s dogs out.


We removed the wood fence from this garden, as it cast a heavy shadow in winter when the sun was low in the sky.  Because this is California, there is a long growing season and we wanted to make good use of the little space available. Many neighbors stop by to admire the beautiful vegetables and flowers in the front yard.  Keeping this garden well tended all year makes it a neighborhood delight.  Everyone wants a fresh pea in spring and tomato in summer.There are plenty of flowers to keep it cheerful.


3.Create permanent beds and paths. Permanent beds create pattern and form in a garden even when the beds may be empty. The same is true for paths. They are cleaner, safer and create form in the garden.  Paths also keep people from walking on the beds. Here are a few different solutions.  Stone paths are more expensive, but last longer and are beautiful. Chipped paths look good and are inexpensive.  They also allow the water to seep into the soil for water retention.

raised stone bed

Permanent beds give form and interest even without all the plants. Chipped paths are easy to lay and inexpensive.

Stone paths are safe, beautiful, long lasting and also more expensive.  Choose a material appropriate for you and your budget.

Stone path

A winding path leads you through the garden to the front door.

4. Choose plants the grow well in your climate and in your site.  Choose appropriate sized plants. Meaning, if you have a small front yard, use dwarf or semi dwarf trees, or small shrubs. Fruit trees, blueberries, currants, strawberries mixed with flowering shrubs all make wonderful front yard plants.  They look good in most seasons.  Use perennials in your front yard and keep the annuals to a minimum. When growing vegetables in the front yard, keep them well tended if your yard is open to the neighborhood. It’s all part of being a good neighbor. The more you share the bounty, the  more your neighbors will want to imitate your garden.

Edible front yard

Summer in the edible front yard still looks great. (click to enlarge)

side view of the edible front yard

Herbs, flowers and a simple fence for the edible front yard. (click to enlarge)


These are a few ideas to help you plan your edible front yard. There will be more ideas to come. Sign up for my blog and you won’t miss anything.

Feb 082012
 
New plantings in the spring garden


by Avis Licht  –

New plantings in the spring garden

Pots near the kitchen are great for herbs


Early Spring is the time for gardeners to get ready for their early vegetable garden.Here are a few things to think about to help you get started.

SITE

1. Pick a place near the house for your vegetable garden so that you will see it everyday. Out of site is out mind for most people. Visit your garden for at least 10 minutes a day and you will keep up with the maintenance and see how plants are doing.  You’ll discover if there are any problems before it’s too late.

2. Pick a sunny site that gets at least 6 hours of sun. Most vegetables need this amount to grow well.

3. Make sure there’s water near by for irrigating.

SIZE

Raised bed gardening

Easy to reach, easy to plant, easy harvest, it's a raised bed

1. Keep it Small and Simple, as the saying goes. First time gardeners should start small and be successful.  Graduate to a larger plot next year. A couple of beds, 3 ft x 6 ft, will give plenty of delicious vegetables.

2. Consider growing your herbs in pots near the kitchen where they are easy to harvest.

SOIL

1.Whatever kind of soil you  have, be sure to loosen it and add compost. By aerating your soil and adding humus you will increase oxygen, nutrients and drainage, which will help your plants grow. You can loosen your soil by digging, rototilling or bringing in topsoil and adding it to a raised bed.

2. Check your soil for drainage. If you see standing water on the surface, or if you dig a hole and there is water in the bottom, you need to make some adjustments. Vegetables don’t like to grow in standing water.  There are several ways to improve drainage.  Dig into the hard soil with a digging fork and loosen it. Raised beds provide better drainage. You can also dig a small ditch and direct it away from the growing area. This will help move water away and improve your soil.

3. Create paths for walking in the garden.  Every time you walk on the soil you compact it. This prevents air and water from entering. Just by using paths and not walking on the beds you will increase the health of your soil and your plants.

CHOOSE YOUR VEGETABLES WISELY

Choose your plants wisely

Early spring you can sow and plant broccoli, cabbage, cauliflower

1. Choose your favorite foods to grow. Zucchinis are easy to grow, but if you don’t like them, don’t grow them! Peas, carrots, beans and tomatoes taste better when harvested ripe and fresh. They are easy to grow and harvest.

2. Choose what grows best in your climate and your site. If you’re in the cool Northwest  U.S. you might want to pass up on the hot peppers and melons.  Cooler climates are good for broccoli, cabbage, lettuce, spinach, chard and kale. If you’re in a hot climate go for the peppers, melons, squash and eggplant.

3. Look for micro climates in your garden to give you more opportunities to grow plants that you might otherwise leave out. A micro climate will be a place that is sunnier ( on the south side of the house), cooler (on the north side), calmer (on the lea side of a fence or windbreak), shadier (under a tree) and so on. Check out your garden for mini climates.

RESOURCES

1.Your local nurseries will be carrying plants appropriate for your climate.  Ask them questions.

2. For the Western United States, consult Sunset Western Gardening Book.  It is amazing in it’s information for so many regions in the West.

3. Seed Catalogs and Online companies. Check out my list in the resource page.

Raised beds

Double dug beds are raised and need no edging


Jan 252012


by Avis Licht

Size matters in sowing seeds

Very large and very small seeds often should be sown directly into the soil

There are times when sowing seed is the best way to start your plants, and times when you would do better to buy seedlings. Here are a few of the most commonly made mistakes and how to avoid them.

Mistake: Sowing seed into pots that should go directly into the ground.

Correct : Sow directly into the ground

Direct sow into the ground for best results

Plants with taproots like beet and carrot need to be sown directly into the ground

Some seeds are best sown directly into the soil where they will grow. Root crops like carrots, beets, radish and turnips have taproots that don’t like to be transplanted.

Very small seeds, like poppies and carrots can be mixed with sand in order to spread them more evenly.

Large seeded plants like beans and peas do better when sown directly into the ground.  You should plant them 2 to 3 inches deep. They send a large root deep into the soil and don’t like to have their roots disturbed.

direct sow your fava beans

Large seeded plants like beans and peas can go directly into the soil.

Mistake: Sowing indoors without sufficient light

Correct: Use additional lights

In  the hopes to get a jump on the growing season, people like to start their seeds indoors.  It is almost impossible for plants to get enough light from a window to grow strong and healthy.  Leggy seedlings rarely recover and won’t make for strong plants when transplanted.

Leggy seedlings need more light

These broccoli seedlings are leaning toward the window for more light. They are leggy and not what we’re looking for

If you do want to start indoors, get fluorescent lights and put them over your containers.  You can find these through catalogs or make a simple set up yourself. Full spectrum lights are best, but regular lights will also work.

Mistake: Sowing too soon in the season

Correct: Be patient and wait. Learn the last frost dates for your garden and what your particular plant needs.

In the excitement to get plants ready for planting outdoors, we often start plants too soon.  This is especially true for warm weather crops like tomatoes, cucumbers and peppers. Even if you have a warm spell early in the spring, it doesn’t mean that you’re plants will be happy outside.  Both the night temperatures need to warm up and the soil needs to warm up.

You can plant early if you use special precautions like cold frames, “Wall o Water”, cloches and row covers. These will protect your plants from those extra cold nights.  But don’t sow your seed early  if you’re not prepared to go the extra step for plant protection.

Mistake: Sowing too many seeds and too many difficult to grow and germinate seeds

Correct: If you’re new at sowing, pick a few of your favorite plants that are easy to germinate. Don’t be fooled by those beautiful pictures in the catalogs. Beware impulse buying!

If you have a small garden and would like a variety of vegetables, it’s often better to buy your seedlings from the local nursery or farmer’s market.  You can get just amount that you need and more varieties.  Instead of 20 plants of one variety, why not get several heirloom varieties and see what does best in your garden.


Jan 202012
 
Raised beds


By Avis Licht

Raised beds have many advantages.  They  provide better drainage,  better access, better plant growth and reduced soil compaction.  There are many ways to build a raised bed.  Let’s  see what would be best for your garden.

Raised beds

Double dug beds are raised and need no edging

The Simplest Raised Beds

These don’t need any built up edge, they only need to be double dug.

This act of digging and moving the soil aerates it and raises it up. Here’s a more detailed explanation.  This is especially effective when opening up the soil for the first time.    By creating “beds” instead of rows, you leave paths for walking and you never step on the bed.  This prevents compaction and allows water and air to penetrate the soil, making for healthier roots. It also lets you plant in a more intensive manner.

Double digging is hard work, but doesn’t need to be done every season. In another post I’ll show you the many reasons for using this method, and different ways you can incorporate  fertility.

Stone for raised beds

Raised beds using stone for both low and tall walls

Stone Raised Beds

Stone lasts forever, and looks beautiful.  It is also easy to create  curving lines in the garden.

As you can see in the photo above, you can use stone to edge your beds, it defines the line and creates a clear path.You can use it to build a wall, which is especially effective on a slope. In this garden, the curved bed was built to 2 ft high, which helps the owner who has back issues.  We  used the opportunity of the height of the bed to bring in some good organic topsoil.

If you bring in soil, be sure to loosen up the bottom of the bed.  It doesn’t help to bring in good topsoil if you don’t have good drainage.

Cost is a factor in deciding whether or not to use stone.  It can be expensive if you have to buy it, and  it takes time to install it.

buildiing curves with stone is easy

This curved bed looks good even when the garden is dormant

Wood Raised Beds

Wood is commonly used for building raised beds in the vegetable garden. Use recycled wood if possible.  Buying redwood or cedar has many implications to the environment.  If you are only raising the beds a few inches, I don’t think wood is worth the effort or the cost.

If you do use wood, be sure not to use pressure treated wood. This includes old railroad ties. The chemicals in this wood are hazardous to your health and the environment.  This article covers the pros and cons of using wood.

Bamboo raised bed

Bamboo or willow can make a great raised bed, especially if you are growing it yourself

You can even find recycled plastic for raised beds. Kits with all the materials you need can make the project simple.  Gardener’s Supply carries all kinds of raised bed kits.


Raised beds with stone from the site

The raised bed just planted


When deciding whether to use raised beds in your edible landscape consider your site, soil, resources and aesthetics.


Vegetable garden

The raised bed a year later-- vegetables and flowers

Jan 092012
 
Red Raspberries

by Avis Licht

Raspberries are growing in the wooden stake area

Raspberries have their place in a large garden, but beware - they will spread like wildfire!

Raspberries are delicious and easy to grow, BUT they have some very big drawbacks. So before you go buying and putting those puppies in the ground read this cautionary tale. Then I’ll tell you how to prune them. Remember, this is a pruning post, not a planting post.  How to plant and care for your raspberries, will be another day.

Red Raspberries

These are everbearing rapsberries, that produce in Spring and Fall

Raspberries grow from perennial roots that produce thorny canes.  They spread horizontally underground. If you live in a climate where it rains during the growing season, or if you irrigate  near the raspberries, you will find that they spread rapidly outside their growing bed.

You can do one of two things to control the spread of underground runners.  Next to your bed you can dig a trench 12 inches deep and put in a root barrier. This would be a material like aluminum, wood or plastic that will keep the runners from spreading horizontally.

Or, you can dig up the runners as you see them springing up in the garden. To my chagrin, I have found runners throughout the garden. Especially in late Spring, you can find me running around like a mad woman digging up unwanted canes. Sometimes it feels like they’re growing as fast as I can dig them up. Some people say it’s easy to dig them up, but my experience is that their roots get entangled with other plants. It’s a pain in the butt to dig them up, so Planter Beware!

If you have a small garden, with room for only a few plants, I don’t think it is worth planting raspberries.  It takes at least 10 original plants to produce enough fruit to make it worth the trouble. That would be a bed 3 ft wide by 20 ft long. Not to mention the maintenance.

On the other hand, once you’ve decided that you have enough room and can keep up with the maintenance, I say, you can’t have too many.  They cost a lot of money in the store, and when you grow them at home, you can eat as many as you want. Who can argue with that?

The most common plants are “ever -bearing” or “twice- bearing” raspberries.  You plant them in the Spring and they produce their first crop in the Fall. Prune these shoots back  in the Winter, and they produce new shoots in the spring that produce a second crop.  These canes will die back after their Fall harvest.  New shoots that come up in the Spring will produce your Fall crop.

In the winter you want to cut back all the dead canes to the ground, prune out any weak shoots that are smaller than a pencil in diameter, and cut the live canes back to 12 inches. Dead canes are brown and live canes are green.  If you have trouble telling the difference in your canes, make a quick cut towards the top of the cane. If it has green around the stem, it’s a live cane.  If the whole cross section of the cut is brown, yep, it’s dead – cut it all the way to the ground.

The pictures below show how mine look before and after pruning.

dormant raspberry canes

BEFORE: Canes of everbearing raspberries before pruning


Pruned raspberry canes

AFTER: Canes have been pruned to about 12 inches above ground.

Raspberry canes, pruned and thinned

Cut out all dead and weak canes. Cut back to 12 inches

In these photos you’ll notice that I have them growing inside a simple wooden structure.  I took some old Redwood pickets, and put them in the ground around the raspberries. The cross pieces are at 2 ft and 4 ft high.  This simple training structure keeps the canes inside, upright and easy to pick.  There’s no tying or drooping.  Anything that grows outside the structure gets dug up. It also looks nice in winter when the canes are dormant.

Despite my warning about raspberries, I think they are a great plant for the edible landscape as long as you know what you’re getting into.

To find out more about raspberries read this excellent article from Fine Gardening Magazine, How to Grow Raspberries.


Jan 032012
 
Deer fence with copper sculpture

by Avis Licht

Deer fence with copper sculpture

A front yard fence that is beautiful and functional

Yesterday I talked about the steps involved in making a landscape plan.  Today I want to share with you a small front yard garden that used those guidelines.

The first parameters you need to look at are your climate, sun/shade, slope, access, existing structures and plantings.  Don’t forget that the sun moves not only east and west, but north and south. The sun is high in the sky in summer and low on the horizon in winter.  Be sure to locate north and watch the sun/shade patterns in your garden over time.  You will be amazed how little sun you have in the winter compared to summer if you have any tall trees or structures.

Path divides garden into shade and sun microclimate

The path divides the garden into edibles and ornamentals based on the sun

In the photo above you can see a 2 story house that creates a lot of shade on the garden. The garden is on the north side of the house.  This means that in winter almost the entire garden is in shade.  In summer the garden has plenty of sun from the path to the fence. Using this information, I created vegetable beds in the sunny part of the garden for Spring to Fall crops.  The beds closest to the house are landscaped with shade loving ornamental shrubs and flowers.

Raised stone bed and bird bath

Using beds with stone to create form and structure keeps the garden looking good all year

The yard is curved to use as much of the available ground the gets sun in the early Spring.  The fence is 6 feet high and keeps the deer out.  The fence is also used to grow climbing vegetables such as peas, beans, cucumbers and tomatoes. Because it is on the north side of the garden it doesn’t shade the other beds.

Once you’ve determined your site functions, based on climate and position, it’s time to start looking at your desires and finances. In this case the owner was a single person with a limited income as a teacher, but who hopes to live here the rest of her life and wanted to make it a special place to come home to every day.  She wanted something beautiful as well as functional.   The vegetable garden is big enough to supply plenty of veggies for her and her rabbits, as well as strawberries, blueberries and apple and pear trees. Once the garden was installed, it is easy to maintain.  The initial investment will pay off many times over in the joy of coming home to a beautiful garden, in addition to the healthy food.

I always recommend that my clients balance their desires, with their budget and their long term goals. If you plan on living in your home for a long time, it is worth spending more money on a strong and safe infrastructure like paths, fences and retaining walls. If you think you may be leaving soon, or are a renter, consider simple beds, containers and annual plantings.

Baby lettuce in raised bed

Vegetables in the raised bed

The raised bed has several functions.  Not only is it a beautiful form that looks good in all seasons, it is strong enough for the owner to sit on while gardening.  For someone with a bad back  this allows for  much easier access to the beds.  We lined the bottom of the bed with hardware cloth, which is a 1/2 inch wire mesh that keeps the gophers out of the bed, which were a huge problem. We also brought in some excellent organic topsoil to fill the raised beds, which produced a wonderful, bountiful harvest.

In considering the “sustainability” factor, we looked at two levels of sustainability.  On a personal level, the garden had to be small enough that she could maintain it in an ongoing basis and that she could afford it. We definitely feel that we accomplished that goal.

On the north side of the house: shade loving plants

Observe your site and put the right plant in the right place

On a “global” level we kept the materials as simple as possible.  The paths are permeable, and covered with old sheets and towels that keep the weeds down, but eventually decompose.  They are covered with free chips from the local tree service.  The beds are built with locally sourced stone.  The irrigation is drip, using a controller that is connected to a local weather station that determines how much to irrigate based on evapotranspiration rates.  And finally, we installed a 2,000 gallon rain water harvesting tank, that stores winter rain from her roof runoff.  This water can be used as back up in times of drought or for fire  safety. In California we are faced with drought, fire and earthquakes.

There’s a lot of information in this post, but it will give you some ideas that you can use in your own garden.  Take time, don’t rush it. The more observation you do in your garden at the front end, the less changes you’ll have to make at the back end.  Your edible landscape is worth the effort.

A welcoming entry into the garden

Copper gate invites you into the garden


Dec 192011
 
Lemon Verbena in flower

by Avis Licht

Lemon Verbena in flower

One of the best herbs for tea and flavoring - lemon verbena

Growing your own herbs for tea and flavorings is easy and satisfying. Many herbs can be grown in pots and brought inside in the winter, to give you fresh, delicious taste. In the next series of posts I’ll go through a variety of my favorite herbs.  Today’s is about Lemon Verbena.

This delicate perennial can survive winters down to 20 deg F, but will lose its leaves in the the winter.  In mild winter areas, it may keep some of its leaves.  So if you have a place in your house for this plant, it is worth the space. We don’t always have lemons available, but you can have lemon flavoring with this plant.  It is tangy and lemony in a way you wouldn’t think a leaf could be.

In the ground, lemon verbena can grow to 8 – 10 feet. It looks better pruned, but is still kind of homely.  However, its flavor more than makes up for any  visual deficiencies.

Lemon verbena prefers  rich, well drained soil. It does better with regular watering, but can become fairly drought resistant with time. Full sun is the best.

In a container, make sure it has compost and well draining potting soil.  Water it regularly, but don’t leave it sitting in water. Put it in a sunny spot by a window.

Lemon verbena grown in the ground

Incredible lemon fragrance makes lemon verbena a favorite shrub

You can use the leaf as a substitute for lemon zest in almost any recipe. It is fine in both sweet and savory dishes. You can use the leaves to garnish fruit salad, or put it in with vegetables such as as broccoli, spinach or asparagus.  You can rub chicken or lamb with the leaf or lay it over fish while baking.

Pour boiling water over the leaves and you have a wonderful tea, or float a few leaves in cold water and have the fresh taste of lemon.

Its uses are really numerous.  Experiment – you can’t go wrong with this plant in your edible landscape.


Nov 292011
 
Lettuce seedlings can be planted in winter

Lettuce seedlings can be planted in winter

Lettuce seedlings can be planted in winter. Plant your seedlings in a sunny well drained site


Although we’re almost to the shortest day of the year, it’s still possible to work and plant in your winter garden, at least in some parts of the United States. You can look out your window and see if you have snow on the ground or you can look up your planting zones in this nifty site.  Type in your zip code and they will tell you what you can plant and when to plant it.

This is the time of year to choose your sites for deciduous fruit trees and shrubs.  Depending on your available space and sunlight, you can consider dwarf or semi dwarf fruit trees, blueberry shrubs, raspberries, and other cane berries, currants, kiwis and grapes.

Kiwi on fence

This kiwi grows on a strong fence.


There are some hardy vegetables like lettuce, chard, kale and all the cabbage family, including broccoli, brussel sprouts and cabbage that can take the cold weather.  A little extra protection provided by row covers can really help your plants grow during the cold weather.

For the very committed gardener  you can use cold frames and green houses to extend your seasons.

There’s no end to the fun one can have in the garden in the winter season.

Nov 142011
 
Vicia Faba also known as Fava Bean

Fava beans make a great winter cover crop

A cover crop is an area of planting that is sown for the purpose of improving the soil and keeping the ground “covered” to prevent erosion.

The right plant can:

  • Increase the  organic matter content of the soil
  • Increase the availability of nutrients
  • Improve the soil’s tilth, which is the texture of the soil
  • Reduce weeds by choking out undesirable plants
  • Reduce soil pests
  • Enhance the soil’s biological activity.

Fava Beans are one of my favorite cover crops. You can sow them late in the Fall even in cold weather.

Fava beans germinate quickly and grow even faster.  You can use the tops for compost, eat the beans, and when you’re done with the plants you can leave the roots in the ground.  Fava beans  will have put more nitrogen into the soil than it takes out.  I mean, this is a plant that keeps on giving.

It’s not a good idea to  leave any areas of your garden bare in the winter. Rain will compact the soil. The ground is subject to erosion and leaching of nutrients when nothing is growing. I sowed my Fava Beans in November and 3 weeks later they were over 8 inches tall. The moral here is better late than never.

In the Spring, when you’re ready to plant your veggies, you can cut down the fava beans even if you don’t harvest the bean for eating.  It will make an excellent addition to your compost pile and leave the soil in better condition.

Once we’ve got our garden planted, we can sit back and welcome winter back again.

Preparing the soil for cover crops

Fava beans will go into the prepared soil

Fast growing fava beans cover quickly
Even in the cold and the shade fava beans grow quickly
Oct 202011
 
sunflower

Sunflower

One of the best foods for us, is one we rarely think about eating: sprouts made from seeds.

Sprouts are one of the most complete and nutritional foods that exist. They are rich with proteins, minerals, vitamins and enzymes. They are a living food that is nutritious as well as delicious.

Seeds from many of your vegetables make excellent sprouts for eating.

The sunflower makes many seeds and since you only need a few for planting next year, you can use the rest for  sprouting some for salads. Sunflower seeds are also great to eat straight from the kernel.

If you want to make sprouts on a regular basis, you need to get them in bulk from a reputable source, that doesn’t spray them with herbicides or pesticides. A great source for seeds for sprouting is Wheat Grass Kits.

Many of you have heard of alfalfa sprouts and bean sprouts, but how about broccoli sprouts? Yep, they’re great too. They have 50 times more of the cancer fighting substance than broccoli. Sprouts are easy to grow and worth the effort. Check it out!

Broccoli for greens and seed

Broccoli can give you much more than you realize


Oct 062011
 

The Edible Landscape

Edible landscaping is the type of garden design I’ve been doing for 35 years.   With landscaping ideas based on the principals of organic, sustainable and beautiful, I will pass on my hard earned lessons to those who are ready for the edible journey. Scroll down the page for all the entries, or go to Click on a topic on the right and choose a category to read. I write about landscape design, ornamental and edible plants, tools, gardening books, critter control and more.

To get an update when I write a new post be sure to subscribe by filling in the subscription widget in the right hand column.

Be sure to comment and ask questions.  I’ll be glad to get back to you.

Yours in the joy of gardening,

Avis

Oct 032011
 
Winter crops, edible landscaping, lettuce

Lettuce planted for winter harvest (click to enlarge)

Whether you live on the East Coast , the West Coast or in between it’s time to prepare for the winter.  As the days get shorter and the nights longer, everyone needs to put their gardens to sleep.  This means different things in different parts of the country.

In the West Coast,  Southwest and South where the frosts come later (or never) you can put in vegetables now for the winter.  This week I planted lettuce, broccoli, kale, chard, carrots, beets, peas and fava beans. We get below freezing weather in the winter, but if the plants are well established by November, they can thrive just fine over the winter.

Now is the time to clean up fallen fruit, old leaves, clear out the dead plants in the vegetable garden and put everything on the compost.

compost, weeds, winter preparation, edible landscape

These weeds are headed for the compost pile.

Mulch your garden. You will protect the soil from compaction and erosion due to heavy rains,  it will keep roots of perennials from freezing and create humus as it breaks down.

In areas that you can’t grow winter vegetables, you can still  put in cover crops. Planting cover crops in the fall to cover garden beds over the winter is excellent practice—beds under a cover are protected from erosive effects of winter weather. In addition, even if we do not see any obvious growth during the dormant period, root growth continues except when the ground is frozen.

Dried flowers. winter garden, edible landscaping

Drying Zinnia flowers for wreaths

In cold climates you can plant oat, vetch, peas, rye and barley.  If they are frost killed, they still will be useful as mulch to cover the ground.

Sep 222011
 

Sheet Mulching for the Edible Landscape:

Former Lawn, now vegetables and fruit

Former Lawn, now vegetables and fruit

What is sheet mulching? Simply put, it is putting several different layers of materials on your soil to get rid of your lawn, weeds and unwanted plants.  It consists of manure, cardboard and  mulch.  You can use different kinds of manure and different mulches. The main purpose is to cover the weeds, allow worms to eat them and to create fertile conditions for growing your new plants. Let me tell you how I got rid of my old lawn.

The day I decided I could no longer stand to mow my lawn one more time, I also realized I wasn’t going to break my back digging it up either. Sheet mulching was my solution, and something you can also do fairly easily. Fall and winter is the perfect time to do this.  You can let the covered area sit over the winter and in spring it will be ready for planting.  Follow the simple directions below and you will be amazed at how easy it is turn turn old and in the way into new and the only way to go.

Decide on an area that you would like to replant.  In  many cases, an old lawn really suits the bill. First you mow the lawn, or cut weeds and leave them on the ground. Next, spread manure 2” deep over the whole area. If you live near horse stables, they will usually be happy to give you the manure for free.  Be sure it has composted and is not fresh.  You don’t want to bring in weed seed. If you can’t find local manure, then you can buy manure in bags from your local nursery. Thirdly,  cover the manure with large pieces of cardboard (obtained free from a nearby appliance store).

On top of the cardboard you can lay another 2 inches of manure. Cover it all with six inches of fluffy hay or any other good looking mulch.  Once done  it looks fine. Your next  help comes in the form of hardworking earthworms.  Imported in the manure they make themselves right at home under their cardboard roofs, and over time (that would be Fall and Winter) they turn the lawn into beautiful soil.  I  sheet mulched my old lawn in the fall and when spring came, I planted varieties of strawberries, raspberries and blueberries as well as lilies, roses, herbs and flowers.  It turned into a cornucopia of beautiful food. The best news was that I didn’t have to dig up the lawn at all, the worms just ate it and turned it into perfect soil.

This is really turning your yard into a beautiful Edible Landscape.

P.S. If you prefer to use custom made fabrics for your sheet mulching, Amazon and Gardeners Supply
icon sell some good products. Both of these links I’ve provided will take you directly to fabrics for sheet mulching.


Close up view of new area for fruit and vegetables, used to be lawn

Close up view of new area for fruit and vegetables, used to be lawn


Sep 162011
 
  • SEEDS, SEEDS AND MORE SEEDS
Seed Packets

Seeds I use (click to enlarge)

I recommend that you get seeds that are easy to germinate, will have excellent taste, and that are organically grown.  Heirloom seeds  have been used and grown by generations of gardeners and deemed worthy. They are also open pollinated and not hybridized.  This means if you let your plants go to seed, you can harvest that seed for next season’s crop.

You can find many varieties of fruits and vegetables in seed catalogs.  Start by picking your favorite foods  and ones that taste best home grown.  Tomatoes are a perfect example. It’s hard to ship a ripe tomato, and unripe ones never taste good.  You can find  many unusual tomatoes in the catalogs that you would never see in a store.

I also recommend starting out with seeds that are easy to germinate. A rule of thumb is the larger the seed the easier it is to grow.  A bean seed is large and you can put it deep enough in the soil that it will not dry out quickly.  A small seed, like carrot seed, has to be kept on the surface of the soil and kept consistently moist.  It’s a little harder to get good germination from these seeds. Some seeds are better sown in pots and transplanted and others need to be sown directly in the ground.  To find out about your seed be sure to read the directions on the packet, or look it up online.

Just keep trying and experimenting.  Starting plants from seeds can be challenging, but also incredibly rewarding.  The following are some great seed catalogs that carry heirloom and open pollinated seed. When you click on the catalogs below you will find that they have a lot of information about what to grow and where to grow and when to grow your chosen seeds.

California Poppy seed from my garden

California Poppy seed from my garden

In the picture on the left you can seed the pods of California Poppies from my garden. They’re easy to pick and wonderful to sow in the Fall.  To buy them is fairly expensive.  To save your own is free and way more fun.

Sep 152011
 
Heirloom tomatoes

Amazing Heirloom tomatoes at the Expo in Santa Rosa

On Tuesday, September13, I went to the Heirloom Exposition in Santa Rosa, California. It was truly amazing.  There were many vendors from seed companies, tool companies, produce, nurseries, irrigation, master gardeners, farms, gardens, restaurants. And everyone there was interested in healthy, organic food.  The ripple of movement towards healthy food is becoming a tidal wave.

The keynote speakers were Jeffrey Smith from the Institute of Responsible Technology, talking about genetically  modified foods and the dangers they pose to human health and the environment, Alice Waters, the pioneer of the local food movement and the Edible School  Yard, and Dr. Vandana Shiva from India, who founded the movement to protect the diversity and integrity of living resources, especially native seeds.

Heirloom gourds

A mountain of gourds at the Expo defies description

Seed Savers Exchange defines heirloom seeds and plants as follows:

The genetic diversity of the world’s food crops is eroding at an unprecedented and accelerating rate. The vegetables and fruits currently being lost are the result of thousands of years of adaptation and selection in diverse ecological niches around the world. Each variety is genetically unique and has developed resistance to the diseases and pests with which it evolved. Plant breeders use the old varieties to breed resistance into modern crops that are constantly being attacked by rapidly evolving diseases and pests. Without these infusions of genetic diversity, food production is at risk from epidemics and infestations.

This is just the tip of the heirloom iceberg. How we grow plants, what we grow, how we take seed, how we harvest, sell and preserve this food is all part of the big picture of growing healthy, safe food, that is good for all living beings and good for the earth.

The simple act of planting food in your own home garden is an important step you can take to make a difference in your lives and your children’s lives. Choosing what to plant and how we take care of our gardens is up to each one of us.

Over the next few days I’ll be telling you about the wonderful seed companies, tool companies and more that I found there.  Just know, that you’re on the cutting edge.

Herbs in box

Herbs in box

Even a small wooden planter box can supply you with healthy, delicious herbs for the season. Start small and keep on going.

© 2011-2024 Edible Landscaping Made Easy With Avis Licht All Rights Reserved