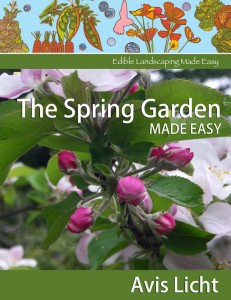
Jan 302012
 
Mint in the garden

by Avis Licht

Mint in the garden

Mint is wonderful, but don't let it escape into the rest of the garden


Mints are quite possibly the easiest, most useful and most annoying herb in the garden. They are tough, unfussy, grow almost anywhere, are incredibly good for your health, can be used in drinks, cooking, insect repellant, digestive aid and more. And they will spread like the dickens in your garden.

PERENNIAL 

Mint is a perennial and will die back in the winter in cold climates. In mild climates you can expect to harvest it all year long.  To have mint in the winter, put it in a pot (you probably want to do this anyway to keep it from spreading) and put it in a protected spot.

VARIETIES

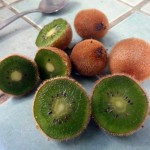
You can find all kinds of mint flavors without resorting to artificial color and flavorings. Imagine – chocolate mint!(M. x piperita “Mitcham”) It tastes like a peppermint patty. Orange ( M. x piperita citrata) or bergamot mint has a slightly orange flavor. Apple mint, pineapple mint, and golden apple mint are all easy to grow. Pennyroyal (M. pelugium) is a small creeping mint that has a very strong flavor and is used  to keep fleas and insects away. Peppermint (M. piperita) and spearmint  (M. spicata)are the most commonly used mints for teas. By growing your own mint you can match the mints with your own preferences. These are just a few of the mints. Go wild!

SOIL

Almost any soil will grow mint, but it prefers a rich, moist soil.  Amend with compost. If you plant it in the ground, consider putting it in a pot or bucket to keep it from spreading. A root barrier around the plants also helps to keep them in check.

PROPAGATION

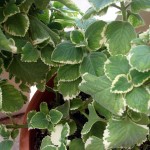
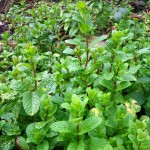
The easiest way to propagate mint is to dig up some from the garden and divide it into as many pieces as you want plants. In this photo, I literally ripped it out of the ground.  It has roots and can be plopped into a pot or a safe place in the garden.

Roots of a mint plant

Pull them out of the ground and replant , as simple as one - two
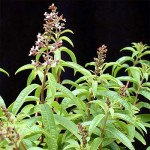
HARVEST

Clip off the the tender new growth. Use it fresh, as mint loses much of its flavor and healthful qualities when dried. If your plants get old and woody, just cut them back to the ground and they’ll send up fresh new shoots.

Never say you weren’t warned!

MINT IN THE LANDSCAPE

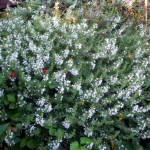
I’ve let this mint grow as the edging to my garden fence.  Cars regularly run over it, but it doesn’t seem to care.  I only use the mint inside the garden for my edible use. Roadside herbs are not the best for eating. But it sure smells good when you step on it.

Mint along the road

Mint as an edging in the edible landscape


Jan 262012
 
Strawberry

by Avis Licht

Strawberry

Who can resist a ripe strawberry?

I recently wrote about fruits that you can grow in small yards. At the top of the list was strawberries. Here are some easy tips to get the best fruit from your plants.

There are many varieties of strawberries. June bearing produce one large crop a year in late spring or early summer. Pick the varieties best suited to your climate. Everbearing strawberries have smaller crops in early summer and fall. Day neutral bear intermittently through the summer.  Since you’re planting for your own use I think it’s best to have several varieties that bear throughout the whole growing season.

CLIMATE

You can find a strawberry for almost any climate. In very hot areas they should have mid day shade. Plants won’t flower over 85 deg F/29 deg C. If you live in extremely cold climates there is even a strawberry that can grow in -30 deg F/-24 deg C without mulch. During blossoming the weather shouldn’t go below 30 deg. F.

Everbearing strawberry

White flowering, red fruiting, beautiful in the edible landscape

SOIL

Topsoil of turf/loam amended with compost and well rotted manure is best.  Be sure not to get the manure near the crown of the plant.  Dress the bed with bone meal and wood ash. It should be well drained and slightly acidic.

WATER

Water the bed when the soil starts to dry out.  Keep the soil moist, but not over wet. When the berries start to ripen cut the watering in half.  Stop watering when they are ripe. If you give strawberries too much water they will get big, but not taste as sweet. Drip irrigation is best to avoid disease problems and fruit rot.

SITE

Full sun for standard strawberries and partial shade for alpine strawberries.

PLANTING

Dig a bed that is loose and friable with good drainage.  Make a hole for your plant and mound the center. Lay the roots around the pyramid of dirt in the hole.  Be sure to keep the crown above soil level or the plant will rot. Water your plant in well. Mulch to keep moisture in. I don’t recommend straw as a mulch because it will promote mildew and be a home for insects.

Description on strawberry planting

Spread their roots and keep the crown above soil level

HARVEST

Wait until the fruit is very red and harvest with the stem. Don’t wash the fruit until you’re ready to eat it.  Homegrown strawberries are like a completely different species than what you will find in the store.  Because you can harvest them ripe and eat them right away.  They will not last long off the plant.

Strawberry fields forever

Strawberries planted in the edible landscape


Jan 232012
 
Strawberries


by Avis Licht

Strawberries

You can have great fruit growing in a small garden.  Here are some of my favorite and easy to grow fruits. Each of them has their own particular needs, so be sure to look up which varieties are best for your climate.

Strawberries are at the top of my list. They can be grown in small areas, they can be planted in pots and they can be spread around the garden.  Commercially strawberries are one of the most heavily sprayed plants both with herbicides and pesticides.  It’s much better to grow your own.

How can a bamboo stick keep a large dog out of the strawberries

Can you have too many strawberry plants?

If you want a fruit tree for a small space, consider a genetic dwarf fruit tree.  They are bred to be smaller without pruning. You can have a full sized apple, cherry, nectarine and more that is only 6 ft tall.A small space is fine for an espalier fruit tree

An espaliered tree can be trained to grow against a wall or fence and take up very little room.  This requires some real attention and work to keep the tree properly pruned and still produce fruit. But once you learn how, it can be incredibly productive in a small space.

Citrus trees can be grown in large pots in a sunny spot near the house or on a deck. Choose naturally dwarf varieties so that they won’t outgrow their containers.

Mandarin orange in a container

It's easy to grow citrus in a pot


Citrus are wonderful for the edible landscape because they are evergreen, fragrant, produce fruit and look beautiful.  Another winner.

Whenever plants are put in pots, be sure they get enough fertilizer to keep them healthy, and regular water.  Pots can dry out quickly because  they are exposed to the sun and wind.


Surprisingly, fig trees can be happily grown in pots.  Normally a fig will grow quite big, but it can be tamed to fit your small garden in a pot and still be healthy and produce plenty of fruit.

Fig in a container

Figs thrive in planting containers

Dwarf blueberries  stay small in the ground and are good for container plantings.

These are a few of my favorite fruits for the small edible landscape.  Enjoy!


Jan 112012
 
Ripe kiwifruit
Ripe kiwifruit

These fuzzy skinned kiwis are Actinidia deliciosa. They ripen in the late fall.

Kiwis seem exotic, but they grow in many climates. They are fast growing, luscious and need plenty of room to grow on a strong support.

SITE: Full sun, and protected from the wind.

CLIMATE ZONES: All kiwis come from  eastern Asia. Fuzzy skinned kiwis can take cold down to 24 deg F. There are varieties called Arctic Beauty kiwi, that are hardy to well below zero deg. F, and the fruit is much smaller. In very hot climates you may need to protect them from the summer sun. But kiwis grow in a wide range of climates and temperature.

SEX AND THE KIWI: The kiwi vine is strong and rampant and needs a sturdy structure to hold it up.  Place the vines at least 15 ft apart.

You also need a male and female plant for pollination. Sex in the plant world is as important as the human world. When you go to the nursery to get your plants, be sure to look at the label to make sure you get a male and female.  It can take up to 5 years from planting to get fruit.  But once you do, you can get up to 200 pounds per vine.

Kiwi Fruit on trellis

Kiwi vine on a strong trellis

SOIL:  The soil should be moderately rich, with good drainage. Give them plenty of compost.

WATER: They also like regular water through the season. Be sure to mulch your vines well, to keep the soil from compacting and to hold in moisture.

PLANTING: You can put in  bare root plants in winter when they are dormant  or you can put container plants in any time during mild weather.

If your garden is large enough, I recommend the kiwi for your edible landscape as a beautiful vine and a wonderfully producing fruit. It does require pruning and maintenance, but is relatively pest free.

HARVESTING: Kiwis in Northern California ripen in mid to late November.  I started harvesting my fruit mid November.  Kiwis DO NOT ripen on the vine.  They are firm to the touch when picked. Place them in a paper or plastic bag, with an apple or banana, to ripen for about a week.  Be sure to test them often. When they start to give a little, they are ripe.  Just peel it and try it.  If you have a lot of fruit, like I did this year, you can harvest them and place them in the refrigerator or other cool spot where they will stay for a few months without problem.

Bring them into the warm room in a bag to ripen as needed.


Jan 092012
 
Red Raspberries

by Avis Licht

Raspberries are growing in the wooden stake area

Raspberries have their place in a large garden, but beware - they will spread like wildfire!

Raspberries are delicious and easy to grow, BUT they have some very big drawbacks. So before you go buying and putting those puppies in the ground read this cautionary tale. Then I’ll tell you how to prune them. Remember, this is a pruning post, not a planting post.  How to plant and care for your raspberries, will be another day.

Red Raspberries

These are everbearing rapsberries, that produce in Spring and Fall

Raspberries grow from perennial roots that produce thorny canes.  They spread horizontally underground. If you live in a climate where it rains during the growing season, or if you irrigate  near the raspberries, you will find that they spread rapidly outside their growing bed.

You can do one of two things to control the spread of underground runners.  Next to your bed you can dig a trench 12 inches deep and put in a root barrier. This would be a material like aluminum, wood or plastic that will keep the runners from spreading horizontally.

Or, you can dig up the runners as you see them springing up in the garden. To my chagrin, I have found runners throughout the garden. Especially in late Spring, you can find me running around like a mad woman digging up unwanted canes. Sometimes it feels like they’re growing as fast as I can dig them up. Some people say it’s easy to dig them up, but my experience is that their roots get entangled with other plants. It’s a pain in the butt to dig them up, so Planter Beware!

If you have a small garden, with room for only a few plants, I don’t think it is worth planting raspberries.  It takes at least 10 original plants to produce enough fruit to make it worth the trouble. That would be a bed 3 ft wide by 20 ft long. Not to mention the maintenance.

On the other hand, once you’ve decided that you have enough room and can keep up with the maintenance, I say, you can’t have too many.  They cost a lot of money in the store, and when you grow them at home, you can eat as many as you want. Who can argue with that?

The most common plants are “ever -bearing” or “twice- bearing” raspberries.  You plant them in the Spring and they produce their first crop in the Fall. Prune these shoots back  in the Winter, and they produce new shoots in the spring that produce a second crop.  These canes will die back after their Fall harvest.  New shoots that come up in the Spring will produce your Fall crop.

In the winter you want to cut back all the dead canes to the ground, prune out any weak shoots that are smaller than a pencil in diameter, and cut the live canes back to 12 inches. Dead canes are brown and live canes are green.  If you have trouble telling the difference in your canes, make a quick cut towards the top of the cane. If it has green around the stem, it’s a live cane.  If the whole cross section of the cut is brown, yep, it’s dead – cut it all the way to the ground.

The pictures below show how mine look before and after pruning.

dormant raspberry canes

BEFORE: Canes of everbearing raspberries before pruning


Pruned raspberry canes

AFTER: Canes have been pruned to about 12 inches above ground.

Raspberry canes, pruned and thinned

Cut out all dead and weak canes. Cut back to 12 inches

In these photos you’ll notice that I have them growing inside a simple wooden structure.  I took some old Redwood pickets, and put them in the ground around the raspberries. The cross pieces are at 2 ft and 4 ft high.  This simple training structure keeps the canes inside, upright and easy to pick.  There’s no tying or drooping.  Anything that grows outside the structure gets dug up. It also looks nice in winter when the canes are dormant.

Despite my warning about raspberries, I think they are a great plant for the edible landscape as long as you know what you’re getting into.

To find out more about raspberries read this excellent article from Fine Gardening Magazine, How to Grow Raspberries.


Jan 042012
 
A garden full of herbs for birds, butterflies and humans

by Avis Licht

A garden full of herbs for birds, butterflies and humans

Herbs are wonderful plants for the edible landscape -beautiful and healthy

 Herbs have many uses in the landscape.  Many have a culinary use, many are used medicinally, they are generally easy to grow, their flowers are an excellent source of pollen and nectar for birds, bees and insects, often drought resistant and long lived.  Well, it doesn’t get much better than that for a multi use plant.

In the two previous posts, I talked about making garden design decisions based on your climate and place and on your desires. When choosing plants to fill in the landscape you not only want to use plants that are pretty and useful, but also “belong” there.  By belonging I mean that they fit in with the style of your garden, whether formal or informal, that they will thrive in the conditions and that they work in the scale of the garden.

A mixed herb and ornamental garden

Herbs are interplanted with ornamentals near the house for easy access

This is a newly planted garden.  The herbs are young and small. When mature they will fill in the area and create a feeling of beauty and lushness. When the herbs have been harvested at the end of the season, there will still be ornamental plants in the garden that keep it looking good over the winter. This is one of the best tricks in an ornamental edible landscape design.  Combine your annuals with shrubs and perennials so that you don’t have periods in the garden that look bare.

Purple and Green Basil

Mix your foliage colors for interest

Salvia, basil, parsley and thyme

Multiple herbs, both annual and perennials work together


This particular herb garden has thyme, sage, oregano, tarragon, dill, chives, parsley, cilantro and several varieties of  basil. We also used rosemary and thyme to cascade over the wall, with nasturtiums for added color.  Many of these plants have edible flowers. The herbs grow quickly and fill in the garden.

The ornamental plants in this bed include Azalea, Pieris, ferns, and Polygala. These are shade loving plants, which we put closer to the tree. We put the herbs in the sunniest part of the bed.  It was a little tricky, but you can see by the photos that the herbs grew well even in part shade.

Rosemary is larger and long lived

Give your Rosemary plenty of sun and room to grow

Nasturtiums cascading over wall

Mixed annual and perennial herbs cover the retaining wall


A few of the herbs that are planted more for beauty than culinary use include lavender, salvias, yarrow and ornamental oreganos.  By going to your local nurseries you will find appropriate herbs for your garden’s beauty and health. Peruse some of the catalogs in the Resource page of my website and you will find many herbs both common and unusual that will be just right for your garden.

Pink Yarrow - Achillea millefolium

Pink yarrow lives a long time and requires little care or water


Dec 222011
 
winter savory - Satureja montana

winter savory - Satureja montana

Introduction:

As the title of my blog suggests, I like to do things the easy way whenever possible. Winter Savory is one of those herbs that rank right up there in the easy column. It grows with little care, has no pests, requires little fertilizer or water – what more could you ask of a plant? Winter savory is a perennial herb that grows in all zones.   It has a tangy flavor similar to thyme but is a gentle herb when used in cooking.

Climate:

As far as I can tell, Winter Savory is hardy to -20 deg F.  That’s pretty darn cold.  It comes from the temperate regions of the Mediterranean, but survives in much colder climes. Since it is a perennial it will die back in the winter to the ground. So I’m  not sure why they call it winter savory, since it doesn’t have any green leaves in winter.  Oh well.

Care:

Like other Mediterranean herbs it likes a simple, well drained soil.  Remember, not too rich – no manure or heavy fertilizer. It makes the plant lose it’s aromatic oils which produce the flavor and qualities of the herb. It is a very drought tolerant plant.  I’ve put in places where it got almost no water and it thrived.  I’ve also put it in areas with regular water and it did fine there as well.  Don’t over water, or let it sit in damp places.

In winter I cut it back to the ground.  In  very cold climates you should wait until spring to cut back the plant.  The dead growth on top will help protect the plant.

Winter savory in winter

The top of the plant dies back in winter

Winter savory cut back to the ground

Cut all the dead growth down to the ground

Close up of new growth at the base of the plant

These new shoots will overwinter and begin to grow in Spring

Harvesting and Uses:

You can harvest the leaves and the flowers from this plant. Use the leaves fresh in savory dishes like chicken, fish and pork.  It is renowned for it’s work with beans (by this I mean reducing the flatulental qualities).

You can also make a gentle tea from the leaves which some say helps with sore throats. It couldn’t hurt.

In the edible landscape I use winter savory as an edging plant along paths.  I have a lot of rocks in my garden, that I use to edge paths.  I plant the savory next to the rocks and they do a lovely job of edging and growing over the rocks.

Books About Herbs:

Encyclopedia of herbsRodale’s Illustrated Encyclopedia of Herbs is an excellent source of information on herbs.


Sunset Western Garden book of EdiblesSunset Western Garden book of Edibles has a very detailed section on growing common herbs.


Dec 212011
 

by Avis Licht

Edible blossoms from the pineapple guava

You can eat the petals from this plant. They’re good!

The Pineapple Guava is one of my favorite plants.  It serves many purposes in the edible garden. It’s an easy care, evergreen shrub that has edible flowers, edible fruits and somehow, the deer DON’T eat it.  How could you know?

Where I live, deer eat almost all our plants, so having one that does all these good things is a real treasure.

Climate:The Pineapple guava grows in Zones 8 – 10.  What this really means is that it likes some cool weather, can go down to 10 deg. F, likes rain in the 30″ – 40″ range, and doesn’t like super hot daytime weather – not so good in the desert.

Soil: It’s adaptable to a wide range of soils, including acidic soil, but prefers a humus rich soil that is well drained.  Adding compost and not manure works for this plant.

Water: This is considered a drought tolerant plant, meaning it survives with relatively little water, but needs adequate water for good fruit production. During dry spells you should give it additional water.  In real terms, this means observe your plant. In real terms, in the garden, you always need to observe your plants.  Everyone’s garden is different from the norm that all these books talk about.  You’ll always want and need to adjust requirements to your own situation.

If you need some great information on starting your Spring Garden, have a look at my new ebook, called The Spring Garden Made Easy

the leaves of the Pineapple Guava are neat and compact.

You can prune it, you can eat it, you can watch the hummingbirds feed on the flowers

Sun: Full sun is best – but it can tolerate partial shade

Wind:The Pineapple guava makes a good windbreak. It can take some salt air, but I wouldn’t put it on the dunes as a first line wind break.

Care:  What I really love about this plant is that it needs so little care.  It just grows happily on its own. You can prune it for shape or let it alone. If you prune it back hard, you will lose some fruit production.

Pests: Almost none. Well, I haven’t seen any.

Fruit and flowers:  The flowers which bloom late Spring are edible. The thick petals are spicy and are eaten fresh. The petals may be plucked without interfering with fruit set. The fruit ripens in late Fall, which is a great boon, since almost everything else in the garden is gone.  The fruit in the picture below, came from my garden on December 22 after many days of frost. They taste fresh and tangy. We eat them by scooping out the fruit with a spoon.  Or you can  cook them in puddings, pastry fillings, fritters, dumplings, fruit-sponge-cake, pies or tarts.

Be sure to check out my store for great tools and garden implements.

Scoop the fruit of the pineapple guava

Cut the fruit in half and scoop it out with a spoon. Really tasty.

If you live in the right climate, I really think you ought to try growing the Pineapple Guava. It’s a giving and a forgiving plant for your edible landscape.

If you want to know a lot more about gardening I have lots of posts on my blog and a new e book called The Spring Garden Made Easy. For $4.99 it’s the deal of the century. Check it out here: https://www.ediblelandscapingmadeeasy.com/publications/.

Spring Garden Made Easy

[portfolio_slideshow id=1000].


Dec 202011
 
Oregano variegated

By Avis Licht

Oreganum vulgare hirtum

Whether you call it Oregano or Marjoram it tastes almost the same

It’s been confusing to a lot of people for a long time.  What is the difference between Marjoram and Oregano? Not exactly a life changing question, but certainly one that (at least some) gardeners need answered.

The oregano tribe  includes plants that are called both marjoram and oregano. Both are from the Mediterranean area and are attractive to bees and butterflies. Sweet marjoram (Oreganum majorana and O. hortensis) grow in zones 8-24. It has a mild flavor. You can use both the leaves and the flowers in cooking.

Grow all varieties in full sun with good drainage. You can plant most of the year from plants or propagate by division from older plants.  If you live in a very cold climate, with snow and long lasting frosts, this plant can be grown indoors in pots on a sunny windowsill. Choose a compact variety if you grow it in a pot. ‘Country Cream’ or or ‘White Anniversary’ are good for pots.

As with other Mediterranean herbs, this one does not need much water or fertilizer. Gardeners often make the mistake of giving too much love to their plants. Herbs in particular do not need to have high levels of nitrogen in the soil, or too much moisture.  These will dilute the flavor of the herb.

Oregano variegated

Mix your foliage colors in the garden to add beauty and interest

A beautiful form of Oregano is the variegated leaf, ‘Aureum’, ‘Aureum Crispum, or Oreganum variegatum.  In the edible landscape it’s good to combine both qualities of beauty and practicality.

If you decide to grow your herbs in pots, you might consider using self watering planters They have a reservoir at the bottom, that wicks up into the soil.  It keeps the plant moist, but not too wet.

For those of us who can’t grow a house plant for the life of us, this is a definite must have. These planters, are also great outdoors. If you have a sunny protected south wall, you can grow many herbs outside, even in cold climates. It doesn’t hurt to try.

Dec 192011
 
Lemon Verbena in flower

by Avis Licht

Lemon Verbena in flower

One of the best herbs for tea and flavoring - lemon verbena

Growing your own herbs for tea and flavorings is easy and satisfying. Many herbs can be grown in pots and brought inside in the winter, to give you fresh, delicious taste. In the next series of posts I’ll go through a variety of my favorite herbs.  Today’s is about Lemon Verbena.

This delicate perennial can survive winters down to 20 deg F, but will lose its leaves in the the winter.  In mild winter areas, it may keep some of its leaves.  So if you have a place in your house for this plant, it is worth the space. We don’t always have lemons available, but you can have lemon flavoring with this plant.  It is tangy and lemony in a way you wouldn’t think a leaf could be.

In the ground, lemon verbena can grow to 8 – 10 feet. It looks better pruned, but is still kind of homely.  However, its flavor more than makes up for any  visual deficiencies.

Lemon verbena prefers  rich, well drained soil. It does better with regular watering, but can become fairly drought resistant with time. Full sun is the best.

In a container, make sure it has compost and well draining potting soil.  Water it regularly, but don’t leave it sitting in water. Put it in a sunny spot by a window.

Lemon verbena grown in the ground

Incredible lemon fragrance makes lemon verbena a favorite shrub

You can use the leaf as a substitute for lemon zest in almost any recipe. It is fine in both sweet and savory dishes. You can use the leaves to garnish fruit salad, or put it in with vegetables such as as broccoli, spinach or asparagus.  You can rub chicken or lamb with the leaf or lay it over fish while baking.

Pour boiling water over the leaves and you have a wonderful tea, or float a few leaves in cold water and have the fresh taste of lemon.

Its uses are really numerous.  Experiment – you can’t go wrong with this plant in your edible landscape.


Dec 142011
 
blueberris grow in many climates and are beautiful, delicious and healthy

Blueberries are one of the most prized plants for the edible landscape

Blueberries are one of the best plants you can choose for your edible landscape. They are easy to grow, beautiful in all seasons, and give absolutely delicious and nutritious fruit. By growing your own organic blueberries you can be sure they are the best and the safest.

There are a few things you need to know about blueberries and your climate in order to choose the best variety for your garden. I’ll make it simple here, but if you’d like to know more be sure to watch this video on planting and choosing your blueberries.

First of all you need to determine your growing zone. You can do that by typing your zip code into this USDA chart or  the Sunset Garden book also offers growing zones by zip code here for the United States.

USDA Hardiness Zones:

The zones vary based on type.

  • Northern highbush : Zones 4-7
  • Southern highbush : Zones 7-10
  • Lowbush : Zones 3-6
  • Half-high : Zones 3-7
  • Rabbiteye : Zones 7-9

All blueberries like acidic soil, similar to conditions that suit azaleas and rhododendrons. You can add peat moss to your soil to lower the pH (4.5 – 5.5). You should also use
Shrubs Alive!TM acid food and fertilizer.>  Blueberries have fine surface roots, which should not be disturbed by cultivation. I like to heavily mulch my blueberries with sawdust. This protects the roots, keeps the soil moist and the weeds to a minimum.


Blueberry turning scarlet in winter
Blueberries provide interest in the landscape in all seasons

There are several kinds of blueberries.  Highbush blueberries grow upright  between 5 and 6 feet tall. They require winter cold and their fruit ripens from late spring to late summer. Most high bush varieties grow in colder climates. Northern highbush grow in zones 4-7. Southern varieties grow in zones 7-10.

Lowbush blueberries grow in Zones 3-6. As the zones suggest, these are very good for cold places. These grow only 6-18″ high. They have underground runners. Find the right varieties in your local nursery or order from catalogs for your zone
icon.

There is another variety called half -high. Half-High mixes the benefits of highbush – large fruit – with the benefits of lowbush – cold tolerance.

Finally there are rabbiteye blueberries. Rabbiteye grows in Zones 7 to 9. These can grow over ten feet tall.

In addition to acidic soil, blueberries need full sun, well drained soil and continuous moisture for best fruit production. Although some varieties are self pollinating, it is better to have at least two different varieties for best fruit production.

It is simple to prune blueberries. On older plants cut back the ends of twigs to strong buds. Remove some of the oldest branches each year and any dead or weak shoots.  This gives the plants more air and light.

Pick the fruit when it is a dark blue. Like these:

Blueberries are delicious and really nutritious

It doesn't get much better than this. Blueberries - ahhhhh!

The health attributes of the blueberry are many, but really we eat them because they are sooooo goood. I urge you to find a place in your garden for this most wonderful of plants.


Nov 292011
 
Lettuce seedlings can be planted in winter

Lettuce seedlings can be planted in winter

Lettuce seedlings can be planted in winter. Plant your seedlings in a sunny well drained site


Although we’re almost to the shortest day of the year, it’s still possible to work and plant in your winter garden, at least in some parts of the United States. You can look out your window and see if you have snow on the ground or you can look up your planting zones in this nifty site.  Type in your zip code and they will tell you what you can plant and when to plant it.

This is the time of year to choose your sites for deciduous fruit trees and shrubs.  Depending on your available space and sunlight, you can consider dwarf or semi dwarf fruit trees, blueberry shrubs, raspberries, and other cane berries, currants, kiwis and grapes.

Kiwi on fence

This kiwi grows on a strong fence.


There are some hardy vegetables like lettuce, chard, kale and all the cabbage family, including broccoli, brussel sprouts and cabbage that can take the cold weather.  A little extra protection provided by row covers can really help your plants grow during the cold weather.

For the very committed gardener  you can use cold frames and green houses to extend your seasons.

There’s no end to the fun one can have in the garden in the winter season.

Nov 192011
 
Tea pots for the Tea Party?

A variety of teapots will always come in handy

One of the easiest edibles to produce in your own home garden is a drinkable.  Herbal teas are easy to grow, delicious and good for you. One can always buy dried tea at the store, but fresh herb tea is another thing altogether. The fragrance and aroma goes straight to the brain and release those happy endorphins.

Mint in its many forms: spearmint, peppermint, lemon balm, and other herbs:  raspberry leaf, lemon verbena, rose hip, chamomile, comfrey, nettle.  The list goes on and on.  Even the smallest garden can grow  herbs for tea. When you grow your own, you know that it is clean and organic.  And best of all, you can pick it and use it straight from the garden at its most nutritious.

After picking your leaves, wash carefully, then rub them together to let the essential oils out.  Add the herbs to a teapot or directly to a mug or cup. For each cup of tea, add approximately 2 to 3 teaspoons of fresh leaves and/or flowers. Slice rose hips in half before adding.

tea cup with strainer

This tea cup came with its own strainer.

A beautiful teapot or tea cup with strainer makes a wonderful gift. They don’t need to be expensive to be delightful. One of the signs  of a good teapot is a strainer to put the tea leaves in.  You can then remove it from the teapot or the cup when it is done steeping.

Everyone can enjoy their favorite tea if you have several small teapots available for making different teas. Glass teapots are very elegant. But apparently very breakable, which is why I don’t have a picture of mine to show you.

For those of you with a little Irish in your soul, you can add a little something to your tea to warm you up on those extra cold winter nights. I’ll leave it to your imagination to figure out what that is.

Enjoy!

Tea Pot with strainer

Small and elegant with its own strainer. A classic look.

Tea cup with strainer and top

Who could resist this sweet cup with its own top

Nov 092011
 
Garlic

Use the largest cloves from the garlic

In mild weather climates, it is still possible to plant your favorites  from the onion family. Garlic, shallots and onions are all in the same family, Allium, and are easy to grow. You need open, sunny ground, in well drained soil that has been fertilized with bone meal and manure.

There are many varieties of garlic to cho0se from. Look in some of these catalogs. My friend Robert Kourik has written a great article on garlic that goes into more detail on varieties and planting techniques.

Garlic is a good plant to put throughout the garden; under fruit trees, around roses and on the edgings of beds.

Shallots are a close relative of the onion that taste like a cross between an onion and garlic and is prized in cooking for its distinctive flavor.

Onion bulbs can also be planted now, but transplanting seedlings and seed sowing need to be done in the Spring.  There are many varieties of onions that require appropriate planting methods.  Consult your local nursery for advice on varieties that grow well in your area.

Even in mild weather climates, it will soon be time to just sit back and enjoy the winter days, reading a good book and taking it easy.  Let the garden just, as one might put it, vegetate.  I’ll be using these days to write about garden design. You can start dreaming about how you might make some changes in your landscape, and put in a few more of your favorite edibles.

Nov 012011
 
Butternut Squash

My rampant squash plants produced a good harvest of Butternut Squash

Winter squash, to be clear, is harvested in the winter, not planted in the winter. I have found that some people find this confusing. So now you know.  The best known varieties are Butternut, Acorn, Turban, and Banana. They are characterized by their hard skins as compared to summer squash like zucchini which have soft skins. You can store them in a cool place (about 55 deg) for most of the winter without problem. Unlike summer squash which will rot in a flash when you cannot bear to eat another zucchini dish.

Not only can you eat the meat of the squash, but also the seeds and the blossoms.

The easiest way to cook winter squash is to bake it in a 350 deg oven until soft.  Put a little salt and butter on it and eat it up.  But there are other ways too.

Buternut Squash

Harvested November 1, 2011

We love to eat butternut squash soup in the winter. It’s the perfect meal with a salad and a loaf of good bread. Here’s one of my favorite recipes for soup.  It’s so simple even my husband can make it.  And he has trouble boiling water.


Another great use for Squash: You can save the seeds from winter squash and dry them and roast them to eat.

Here’s a simple recipe for roasted pumpkin seeds, which works for all winter squash:

How to Roast Pumpkin Seeds

1.  Rinse pumpkin seeds under cold water and pick out the pulp and strings. (This is easiest just after you’ve removed the seeds from the pumpkin, before the pulp has dried.)

2.  Place the pumpkin seeds in a single layer on an oiled baking sheet, stirring to coat. If you prefer, omit the oil and coat with non-stick cooking spray.

3.  Sprinkle with salt and bake at 325 degrees F until toasted, about 25 minutes, checking and stirring after 10 minutes.

4.   Let cool and store in an air-tight container

You can also season them with sweet or savory spices like cinnamon or garlic salt. (Although not these two together, please.)

Squash blossom

Even in late Fall we can find squash blossoms to eat

Last but certainly not least you use squash blossoms  raw or cooked. Deep fried, in pizza, baked or in salads. Amaze and delight your friends by serving them something they’ve never seen before.

Here is a link to five fantastic recipes for using squash blossoms.

Give them a try.


© 2011-2024 Edible Landscaping Made Easy With Avis Licht All Rights Reserved