Dec 032012
 

by Avis Licht  

Erosion caused by overgrazing of cattle 

I’m sitting in my office, looking out the window at the pouring rain.  A huge winter storm has descended on us.  For the water we are grateful. We just need to make sure that it  doesn’t all run off  and erode our precious soil. Erosion of topsoil is one of those strangely ignored problems that can create huge problems, but can be addressed with straightforward solutions.

In their book, Topsoil and Civilization, Vernon Carter and Tom Dale, make the convincing case that our misuse of topsoil is directly related to the downfall of civilizations. It takes 500 years to form 1 inch of topsoil and with unsafe soil practices this important layer can be washed away in minutes. They write, “Civilized man was nearly always able to become master of his environment temporarily.  His chief troubles came from delusions that his temporary mastership was permanent.  He thought of himself as “master of the world” while failing to understand fully the laws of nature.”

Topsoil supports life.  Through thousands of years topsoil was formed as organic matter decayed and was deposited in layers.  For 350 million years the quality and quantity of soil and life increased. With the advent of civilized man, soil building processes was reversed in most places.

A tiny fragment of the land area on the earth represents the soil that we depend on for the world’s food supply.  This small fragment competes with all the other needs – housing, cities, schools, land fills, etc. It is up to each one of  us to take care of, protect and enhance our own topsoil.

THINGS YOU CAN DO TO PROTECT YOUR SOIL:

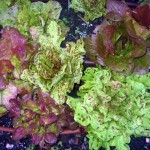
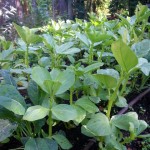
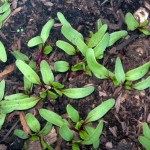
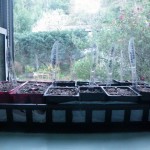
1. Plant to cover your soil. In vegetable gardens use cover crops in the winter where you don’t have vegetables growing.

Plants cover concrete wall

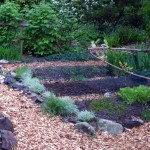
Once the plants are in you can barely see the retaining wall

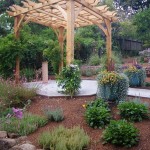
2. Judicious use of wood and stone to form retaining walls can make a big difference in stopping erosion.

Stone for raised beds

Raised beds using stone for both low and tall walls

3. Create ditches and/or swales to slow and redirect water runoff.

Swale, at the top of the hill, redirects runoff, and is also covered with biodegradable fabric that has seed sown in it.

Check out these photographs of  waterfalls in my own garden after 10 inches of rain!

[portfolio_slideshow include=”2104,2109,2110″]


Oct 192012
 
lettuce

by Avis Licht

In Northern California where I live, we can grow many crops over the winter. I’m getting my seedlings in for the Fall and Winter garden.  In this slide show I’m planting lettuce seedlings.  I’ll show you how to gently pry to roots apart and plant them to reduce shock.

Getting the soil ready is an important part of growing healthy plants. In my book The Spring Garden Made Easy, I set forth a simple, straightforward guide to planting that you can use in any season. Check it out!

[portfolio_slideshow]

Using a group of seedlings

Take a clump of seedlings

Gently break apart in half

Gently break apart in half

Open hole and let roots dangle straight down into opening

Open hole and let roots dangle straight down into opening

Firm in gently around the leaves

Firm in gently around the leaves

Water in gently to settle the roots and get the plants going.

Water in gently to settle the roots and get the plants going.

After they are planted you need to make sure they don’t dry out. Check the soil for moisture if it doesn’t rain. Just looking at the surface of the soil doesn’t tell you if it’s moist underneath.  Check with a trowel down a few inches.  If it’s dry at 2 inches or if the plants are wilting, be sure to water them.

You can find out more about extending your season in this article on row covers.

May 302012


worms in the bin

by Avis Licht – I really love worms.  Some people think I’m a little crazy about my worm love, but when you know more about them, you’ll love them too.  It’s hard to believe such a small creature can do so much heavy lifting.   Check out these facts:

1.When compared with soil, worm casts also contain:

5 times more nitrogen;
7 times more phosphorus;
1.5 times the calcium;
11 times more potassium;
3 times more exchangeable magnesium.

2. Worm compost is organic, non-burning and rich in nutrients.  Vermicompost contains eight times as many microorganisms as their feed, which promotes healthy plant growth.

Be sure to sign up with your email to get all my posts. Go to the right column and you’ll find the sign up spot. I never share or give your emails to anyone else. Don’t miss any important gardening information.

3.Worms tunnel deeply in the soil and bring subsoil closer to the surface mixing it with the topsoil. Slime, a secretion of earthworms, contains nitrogen. Nitrogen, as we all know, is an important nutrient for plants. 

4. When expelled, worm casts consist of granules, surrounded by a mucus, which hardens upon exposure to air. When granular castings are mixed into garden or houseplant soils there is a slow “time release” of nutrients. However, the hardened particles of mucus do not readily break down. Instead, they serve to break up soils, providing aeration and improving drainage. Worm casts therefore provide an organic soil conditioner as well as a natural fertiliser.

5. The casts are also rich in humic acids, which condition the soil, have a perfect pH balance, and have plant growth factors similar to those found in seaweed.

Worms live where there is food, moisture, oxygen and a favorable temperature. If they don’t have these things, they go somewhere else. Don’t let this happen to your worms!

Here’s how to provide your worms with a happy home:

1. Get a multi layer worm box.  It allows the worms to travel to new food in the next layer, keeps the rain out, collects worm juice at the bottom and lets you collect finished castings without sifting.  The worms move up to the next layer when they’ve finished the food in the first layer.

Multi level worm bin

2. Layer bedding material in the box.  It can be torn newspaper, sawdust, leaves, dried leaves or any biodegradable, carbon based material. You can use horse or composted rabbit manure. Earthworm bedding should retain moisture, remain loose, and not contain much protein or organic nitrogen compounds that readily degrade.  Don’t put the box in the sun. It will get too hot for your worms.

torn newspaper for bedding

3.Add moist materials like composted manure, soil, leaves and worms. I got these worms from Urban Worm Composting.

Worms for composting

These worms are from Urban Adamah in a composted material. Lay them in the box.

4.After worms are added, keep the bedding moist but not soggy. If you’re using kitchen scraps, cut them up into 2″-3″ pieces. It’s easier for them to eat.  Feed them 2 or 3 times a week, a few cups at a time. If you leave on vacation, don’t worry, they’ll be fine.  Just make sure they have a little food before you go. Cover the food with cardboard or shredded newspaper. It keeps them moist.

food for your worms

Egg shells, banana peels, lettuce, coffee grounds – all good.

5. What NOT to feed your worms: 

Use Caution When Adding These:

Breads — can attract red mites
Potato skins, onions, garlic, ginger — get consumed slowly and can cause odors
Coffee grounds — too many will make the bin acidic

Do Not Feed:

Meat, poultry, fish, dairy — protein attracts rodents
Potato chips, candy, oils — worms do not like junk food and these attract ants
Oranges, lemons, limes — citrus has a chemical substance (limonene) that is toxic to worms

Let me know if you have problems.  There’s usually a simple solution.

Gotta love those worms!

Earthworms galore

Earthworms galore


May 072012
 
Lettuce with drip irrigation


A bed of lettuce

Closely planted lettuce in Spring

by guest blogger extraordinaire: Robert Kourik

Robert Kourik is a guest blogger for this site. He’s definitely got the right credentials. Author of Your Edible Landscape Naturally, and Drip Irrigation for Every Landscape and All Climates, he’s got lots of experience and lots of opinions. In this article he has some radical suggestions for how to use your drip irrigation.  Give it a try and see for yourself if it works in your garden. Let me know what you think. Being conscious of our water use is imperative and drip irrigation is an important tool.

Robert writes:

It’s about time to start up drip irrigation systems. No matter how you use drip irrigation, frequently or every once in a while, it will always be more efficient than any sprinkler you’re currently using.

Consider daily irrigation for the best growth and greatest vegetable yields. Daily irrigation doesn’t use gallons of extra water. Oddly enough, infrequent watering may use more water than frequent, even daily, irrigation. If you have young seedlings, their roots are shallow, near the soil surface. They need access to water easily. Infrequent watering can have the effect of deep soil moisture and shallow dryness.

The other main consideration for frequent watering of small amounts is the texture of your soil. If you have a sandy or light loam soil, water will go through quickly and not be held in the soil. A clay soil will hold moisture much longer and should be watered less frequently. As with all the other tips you’ve read, observation of your own plants in your own garden will be the best way to determine what works best for you.

1/4 inch drip with lettuce

Newly planted baby bibb lettuce with 1/4 in drip

Lettuce grown

Lettuce fills in with 1/4 in drip

Once I planted a drought-resistant landscape with plants such as lavender, santolina, rockroses and rosemary. The day after planting, the timer was set to irrigate for 15 minutes. After the risk of transplant shock was over, the drip irrigation was turned on each day for only eight minutes to replace the moisture lost each day by transpiration. The plants flourished, even though each one-half-gph emitter was distributing only seven tablespoons of water per emitter each day. Contrast this with a nearby garden with a similar soil and plants arbitrarily watered only twice a month for four hours. This amounts to two gallons per emitter for the two-week period, or just more than 18 tablespoons of water per day—more than twice the water used in the flourishing landscape.

Please visit Robert at his website: RobertKourik.com and find out about all his books.

I would add one more thing to help you decide how much and how often to water. Use a moisture meter. It has a probe that you can put into the soil to see what the moisture is at different levels below the surface. A dry surface does NOT mean the soil is dry. You need to check 2 – 6 inches below to see if your soil is wet or dry.

moisture meter

Best tool ever. This will save you time, water and money.

Apr 242012
 
Delicious homegrown tomatoes

We love a salad of different kinds of tomatoes

by Avis Licht – A fresh picked, ripe, delicious tomato is one of the best foods in the garden. They are soooo much better than store bought and so easy to grow, that they are one of the most widely grown vegetables. Here are a few tips that will help insure you get the best, tastiest and healthiest tomatoes.

1. Pick a sunny site. You can’t make up for lack of sun.  Look for at least 7 hours of sun per day.

2. Tomatoes prefer well drained, neutral  to slightly acid soil.  Add lime to acid soil and sulfur to alkaline soil. Make sure your soil drains well. They don’t like sitting in water.

3. Pick several varieties that are suitable to your climate.  For instance, if you live near the coast and fog, it’s better to grow cherry tomatoes that don’t need a long, hot season.  The larger the tomato, the longer the season. There are plants known as determinate and indeterminate.  Determinate types are bushier, need little or no staking and tend to bear all their crop at once.  They do well in pots or containers. Indeterminate grow taller and need staking.  They bear their crop over a longer period of time.  If you plant some of each you will have tomatoes over a longer period. Check out this site for varieties of heirloom tomatoes.

Young tomatoes

Stake your tomatoes early and keep them off the ground to reduce rot and pests

4. Set out your plants after all danger of frost has passed.  The biggest mistake people make is putting out their tomatoes too early, during a warm period in early spring. They get whacked by a late frost, or just cold weather.  Tomatoes like warm soil.  Put the plants in and after the weather warms up a little, then mulch them.

5. Give tomatoes well aged manure or compost.  They don’t need a lot of nitrogen, but do need the micronutrients in the compost for good flavor.

6. HERE’S AN IMPORTANT TIP: Give your tomatoes regular water.  If the roots dry out, they don’t take up the calcium in the soil, which results in cracked fruits and end rot.  However: when the plants are getting ripe, you can cut back on the amount of water. Mealy, watery tomatoes are usually a result of OVER WATERING!


moisture meter

Best tool ever. This will save you time, water and money. Click on the picture to buy it!

I use this simple, inexpensive gauge to let me know how moist the soil is.  You can’t tell by looking at the surface if you need to water.  The top of the soil can be dry and the soil at a few inches below may be wet.  Check first before you water. Believe me, this is one of my most used tools.


7. When you finally get your delicious tomatoes – DON’T put them in the refrigerator.  It ruins their flavor. Keep them out on the counter out of the sun. Hardly anyone knows this. But you know it now.

Cherry tomato

These cherry tomatoes start bearing early, give a lot and last until the first frost.


Apr 192012
 

If you find useful information in my blog, please be sure to sign up for an RSS feed or email subscription.

Blue Forget Me Nots

Weeds come in many disguises like this invasive Forget me Not

This always happens every Spring. I think I’m on top of the jobs I need to do in the garden, and then boom, I look out the window and the weeds have grown overnight like the bean in Jack and the Beanstalk. Although some of them actually look kind of pretty, like these Forget-me-Nots. This innocuous looking plant is actually an aggressive, invasive plant. Have you ever tried pulling out these “innocuous” plants when they’ve gone to seed? Their seeds stick to you like glue and it can take hours to get them off your clothes and socks.

In general we mean a plant is a weed when we don’t want it in the garden at all, or at least not where it has shown up.  Certain plants are always unwanted.  These are the category of pernicious weeds such as poison oak, creeping morning glory, bermuda grass and the plants that are harmful to you or impossible to get rid of. Let me  say right off the bat, that I never use chemical poisons. Weeds in my yard need to be removed by hand, digging them out, or by barriers to cover them and keep them from getting sunlight, or by spraying them with nontoxic potions, such as, Dr Earth Weed and Grass Herbicide or vinegar/soap/ solutions. (Use white vinegar: Add 2 tablespoons of dish soap to vinegar. Pour this mixture in a spray bottle. Spray your weeds!)

In his book, On Good Land: Autobiography of an Urban Farm, Michael Abelman wrote this great bit on weeds.  “When dealing with “weeds,” timing is especially critical.  Remember that “weeds” are merely plants out of place and that weed competition is primarily a problem in the early stages of crop development.

“Three things resolve weed competition easily: early cultivation, the right tool and attitude.  The goal is to never weed but to cultivate.  Cultivation aerates the soil around the plants, and cuts off or buries young tender weeds.  If you have to actually weed, your are too late and will have created far more work for yourself.”

Don’t be too late – start weeding now!

If you want to find some great tasting heirloom tomatoes, Burpee is having a sale. You can get them on special just through this site:$10 off orders of $40 or more with code AFFTOFF thru 4/23 at Burpee.com!

TOOLS  I RECOMMEND.

My favorite tools for cultivating weeds out of your garden:

Long handled hoe

Best use of time and energy - use this hoe early and often

The Hoe : This long handled, double edge weeder, lets you go back and forth for most efficient use.  When the weeds are young and the blade is sharp, you just put it lightly below the soil surface and it cuts them off cleanly, leaving them in the ground.  You don’t have to bend over and it is easy on the back.

Corona Clipper SH61000 Diamond Hoe

The Triangle Hoe: I use this hoe to go between plants that are close together, especially good in vegetable beds and flower beds. Like all other cutting tools, you should keep the blade sharp.


Truper 30002 Tru Tough 54-Inch Welded Warren Hoe, 4-3/4-Inch Head, Wood Handle

Long handled triangle hoe

Great for tight places: vegetables and flowers. The Triangle Hoe $22.99

Hori Hori Japanese Weeding Tool

The Hori Hori: This strong tool is useful for many tasks $27.95

Japanese Hori Hori Garden Landscaping Digging Tool With Stainless Steel Blade & Sheath

Hand Weeding: The Japanese Weeding Knife: Hori Hori Tool

I love this tool and use it all the time. It’s good for weeding, planting, and scarifying the soil. I have a confession, though. I put it down in the garden about 6 months ago and can’t find it. I know it’s there and am sure each day that it will turn up. I’m afraid I’ll have to get another one.  Is there a GPS tracking app for lost hand tools?

SPRAYS: Usually a last resort, sometimes we have to go there.  For particularly pernicious weeds like poison oak, bindweed and bermuda grass I use Dr Earth Weed and Grass Herbicide.  Ingredients include Citric Acid, Cinnamon Oil, Clove Oil, Soybean Oil, Rosemary Oil, Sesame Oil, and Thyme Oil. You can buy this from Organic Green Roots, which donates a portion of every sale to school gardens.

Safe weed spray

Mar 152012
 
Blood Meal

It says "All Natural" but where did it really come from?

by Guest Blogger Extraodinaire- Robert Kourik, author of Your Edible Landscape Naturally

As organic gardeners, we’re always looking for natural and non-harmful ways to add nutrient to the soil to aid in plant growth.  One of the most important nutrients and one of the hardest to find in organic form is Nitrogen.  Nitrogen encourages leafy growth and fruit and seed production. As plants grow, they take nitrogen out of the soil and it needs to be replaced.  But how? Growing nitrogen fixing plants is one of the best ways to restore it in the soil.  But this takes time.  Compost and manures, which are also excellent for the plants, have relatively small amounts of nitrogen.

Blood meal is a fast-acting, high nitrogen, organic fertilizer. It is concentrated and often thought of as “hot”, meaning  too much can hurt tender root hairs or roots. Often just a light sprinkling is enough.  It can have a nitrogen content of 12.%, 1.00% phosphorus and 0.60% potassium. It can also attract dogs, racoons, possums and other meat eating animals that will dig up the garden beds. Blood meal, as you would expect, is a byproduct of the animal butchering industry. It takes a lot of energy to create blood meal in the form we use it in the garden. We also don’t know how the animals were raised.  So it’s a bit of a stretch to call it “all natural and organic” in the way we want it to be safe and harmless to nature.

By knowing what blood meal is and where it comes from, you can make an informed decision about whether to use it or not.

You can save energy by growing a legume crop solely for the accumulation of nitrogen in the lumpy nodules located on its roots—fertilizer gathered free from the nitrogen in the air. Legumes that produce enough nitrogen for hungry crops (like corn) are  alfalfa, fava beans, clover and peas. Till under the young foliage before it blooms—called green manuring. This will increase the yield of crops without using blood meal. Use green manuring of any legume in any annual vegetable bed.

You can read more about fertilizers and everything else you might want to plant in the edible landscape in Robert Kourik’s book, Designing and Maintaining your Edible Landscape Naturally, at his website: www.robertkourik.com


Hellebore

An early flowering, easy to grow plant- Hellebore

Mar 132012
 
Compost and mulch make a beautiful cover for the sil

by Avis Licht

Compost and mulch make a beautiful cover for the sil

A beautiful garden grown with compost, manure and mulch

An organic fertilizer refers to a soil amendment derived from natural sources that guarantees, at least, the minimum percentages of nitrogen, phosphate, and potash. These include plant and animal by-products, rock powders, seaweed, inoculants, and conditioners.  These minimum amounts can be very small. For example, horse and cow manure  often have less than 1% nitrogen by weight. This is not to say it’s not a good fertilizer, it is. But depending on your plant’s needs, you may need to add other sources of nitrogen.

One word of caution. An organic fertilizer means it comes from natural materials, BUT it doesn’t mean it’s organic.  Cottonseed meal comes from a plant, but cotton is one of the most heavily sprayed crops.  There will be pesticide residues in cottonseed meal unless it specifically says it comes from organic cotton.  Bloodmeal and bone meal take a great deal of production and energy to produce these fertilizers. Plus you don’t know how the animals were raised. It can seem very complicated to stay fully organic. When possible ask for the source of your fertilizer.

We take a short break from our program to let you know about this important news. The Spring Garden Made Easy, by me, Avis Licht, is now available for all you enthusiastic gardeners that want to get your Spring garden planted with the least possible problems. Yes, now you too, can have the Garden of Eden in your back or front yard. Or maybe a few lettuces and tomatoes. It’s all in this 20 page ebook, with easy to follow suggestions.  Links in the book will lead you to much more detailed information.  Try it, you’ll like it. Only $4.99.

Spring Garden Made Easy

This is the cover to my book. 

Spring Garden Table of Contents


Different manures have different nutrient values based on the animal, what it ate, how much bedding is in the manure and so on. In another post I’ll talk about the relative merits of different manures. For now, let’s just agree that manure from herbivores that is composted, is a good organic fertilizer. I say herbivores, because we don’t want to use poop from meat eating animals like dogs, cats or humans.  There is risk of parasites or disease organisms that can be transmitted to humans from meat eating animals. For ease of listing, here are Vegetable fertilizers: alfalfa meal, cotton seed meal, green manure, sea weed, wood ash. Animal by-products include: manure, blood meal, bone meal, fish meal, feather meal and bat guano. Mined minerals include: rock phosphate, green sand, gypsum.

compost bin

Compost bin for a family of 4 – 6 people

The easiest fertilizer is compost that you make at home from material in your yard.  But it takes a LOT of material to make a little compost. You’ll probably have to bring in compost or topsoil when you first start your garden. This is not terrible, it just costs money and uses outside resources.  Sometimes we have to do that.

Soil amendments are materials that don’t have a minimum amount of nutrient, like compost.  They can be worked into the soil or laid on top. Amendments are important for the humus they add, the tilth, and aeration of the soil. Without proper soil aconditions, it doesn’t matter how much nutrient you put in.  Roots need air, water and microbial activity, which all comes from adding organic amendments.

Mulch is material laid on the surface and does not add nutrient to the soil until it breaks down over time. Mulch protects the soil from compaction, erosion and keeps the weeds down.  It also conserves water. Even though we don’t call it a fertilizer, it’s a very important part of the garden and soil and plant health.

In previous posts I wrote about legumes, which fix nitrogen and wood ash.  Keep coming back, as I’ll go through the whole list of fertilizers. In the mean time, dig up your beds, or sheet mulch them, and then add compost and/or composted manure.  You’ll be off to a good start.

Mar 092012
 
Fava beans

by Avis Licht

Fava beans
Beans are legumes that “fix” nitrogen

Nitrogen is absolutely vital to plant health, and legumes are the plant world’s way of taking nitrogen out of the atmosphere and putting it into the soil. I think that’s pretty amazing. Therefore, legumes are a gardener’s best friend. Next to rain, which of course is our best, best friend. I’ve written on how rain also brings down nitrogen from the air to the soil for plant use. This is also amazing. But that’s nature for you.Most nitrogen in the world is in the form of a gas – which most plants can’t use. However, legumes, which are in the pea family, grab nitrogen from the air and store it in their roots on nodules. It’s actually a bacterium call Rhizobium that converts the nitrogen gas into a form that will be released into the soil that plants can use. This bacteria occurs naturally in the soil. You can increase the amount of nitrogen that a plant will fix by adding more of this bacteria, known as an inoculant. You can buy coated seed or buy the rhizobium and coat your own seed. You can find out more about them from Peaceful Valley Farm Supply


Here’s a short plug for my book on putting in a Spring Garden. (Keep on reading for more info on legumes.)Spring Garden Made Easy


To help you get started on your Spring Garden,there’s plenty of good advice in my ebook:The Spring Garden Made Easy. It’s $10. If you’ve gotten useful information from my blog,here’s a way to keep me going. Thanks for reading. Be sure to leave a comment and let me know if you have any questions or suggestions. I love to hear from you.


The most commonly grown legumes for nitrogen fixing are alfalfa, clover, fava beans, vetch and peas. The best time to harvest your legumes is BEFORE they flower and form seed pods.  The pods take up most of the nitrogen.  You can cut the plant at the base, leaving the roots in the ground and either put the green tops into the compost pile, or work the greens into the ground.  If you put the “green manure” into the ground it will release the nitrogen over time.  Initially the nitrogen will not be available to  your next crop because it will be tied up in the decomposition process. What this means is that you should plan ahead for legume planting, so that you have time for the greens to break down in the soil before planting your next crop. Legumes make a wonderful cover crop for the winter, and at the same time  prepare your soil for spring planting. If you need to plant immediately, I suggest you put the greens on the compost pile, leaving the roots in the ground.

Nitrogen in legumes

This diagram shows the difference in nitrogen availability in young and old plants. It is from Robert Kourik's book, Designing and Maintaining Your Edible Landscape (used with permission)

There will be more information on organic fertilizers in the next few posts.  Subscribe to my blog and you won’t miss any of this useful information. Robert Kourik will tell you about blood meal – the pros and cons.  Find out about other safe and interesting ways to fertilize your garden organically.


Mar 072012
 
spring flowers

by Avis Licht

spring flowers

Flowers, trees and shrubs love wood ash spread lightly around the base

Just like humans, plants need food to grow well. Where we use protein, minerals and carbohydrates for fuel and growth, plants need nitrogen, phosphorus, potassium and a slew of micronutrients. Over the next few posts, I’ll be writing about different organic amendments. Before you add to the soil it’s important to know at least something about your own soil. Since most of us don’t  know what is in our soil, here are a few  ways to figure out a little about your soil.

You can buy a soil testing kit at your local nursery, or online at Gardener’s Supply. This is a simple and easy to use kit to find out the basics of your soil needs including nitrogen, phosphorus and potassium.

Existing plants, also known as weeds, are a good indicator of soil health and type. If you have lush plants, that are green and healthy looking, you can probably deduce that you’ve got fairly good soil. If plants seem small and stunted, this could mean several things. Compacted soil, low nutrient level or lack of water are the main culprits. This article on Weeds as Indicators of Soil Conditions will tell you much

more about plants as indicators.

Spring Garden Made Easy

 Here’s my new ebook on starting your Spring Garden. 20 pages to help you figure out where to put, what to put in it, and how to keep it healthy.


For those who use a wood stove, wood ash is a free and excellent source of nutrients for the garden.  There are some caveats, so listen up.


Wood ash as fertilizer

Lightly spread wood ash around your plants


1. Wood ash is a source of potassium, lime and trace elements

2. Since wood ash is derived from plant material it contains most of the 13 essential nutrients that soil must have for plant growth.

3. When wood burns, nitrogen and sulfur are lost as gases, but calcium, potasium, magnesium and trace elements remain.

4.After wood burns it has liming agents which raise the pH, this neutralizes acid soil. That means if you have acid soil as in the Northwest of the United States, adding ash wood reduce the acidity.  This is good news for some plants and bad news for others. Read on.

5. If you have acid loving plants like blueberries, rhododendrons, azaleas and gardenias you don’t want to use ash around them

6. Do use ash on flower beds, fruit trees, lawns and shrubs.


7. The fertilizer value depends on the type of wood you burn.  As a general rule hardwoods like Oak produce 3 times more ash per pound of wood and contain 5 times more nutrients than soft woods like Douglas Fir.8. Use one half to one pound of ash per year for each shrub or rosebush.

9. Don’t leave ash in lumps or piles, it can leach too many salts in one place.

10.Use wood ash in compost piles to help maintain the best environment for micro organisms.  Spread a little ash out in layers between adding weeds and kitchen waste to the pile.

11. Don’t use as on newly germinated seeds, it has too many salts for little plants.

(If you are reading this in your email because you are subscribed to my blog, you may want to click on the title and read it in my website.  You’ll have access to all the other posts AND My Book! the Spring Garden Made Easy.)

Wood ash in metal container

Be sure your ashes are cool and in a non flammable container

Mar 052012
 
Healthy, hardy beets germinating outdoors

by Avis Licht

Help your seeds with grow lights

If you don’t have enough light in your house you can use these simple grow lights

Yesterday I talked about seed starting medium and today I want to talk about light and heat.

When starting seeds early in the season, it is usually too cold to start them outside.  That means, they are either in the house, cold frame or greenhouse.  It’s a rare house that has enough sunlight to start seedlings indoors and not have them get leggy.  It’s an even rarer house that has a greenhouse or cold frame.

Light for starting seeds:

Most seedlings require 14 to 16 hours of direct light to manufacture enough food to produce healthy stems and leaves. The characteristic legginess that often occurs when seedlings are grown on a windowsill indicates that the plants are not receiving enough light intensity, or enough hours of light. If your seedlings are in a south-facing window, you can enhance the incoming light by covering a piece of cardboard with aluminum foil and placing it in back of the seedlings. The light will bounce off the foil and back onto the seedlings.

If you do not have a south-facing window, you will need to use grow lights. When growing seedlings under lights, you can use a combination of cool and warm fluorescents, or full-spectrum fluorescent bulbs. Incandescent bulbs produce too much heat in relation to the light given off. They also lack the blue-spectrum light that keeps seedlings stocky and dark green.

To get excellent pots, potting soil, greenhouses and more, go to my store and you can find what you need easily.

Simple outdoor growing house

Along a protected south facing wall, this little house can provide protection for your seeds

Seedlings need a high intensity of light. The fluorescent bulbs should be placed very close to the plants—no more than three inches away from the foliage—and should be left on 12 to 14 hours per day. If you are growing your seedlings on a windowsill, you may need to supplement with a few hours of artificial light, especially during the winter months.

Temperature for starting seeds:

The temperatures for optimum germination listed on seed packets refer to soil temperature, not air temperature. Although seeds can vary drastically, most vegetable seeds need a warm soil temperature around 78 deg. F.

If the soil is too cold, seeds may take much longer to germinate, or they may not germinate at all. To provide additional warmth, you can use a heat mat or place the containers on top of a warm refrigerator, television, or keep them in a warm room until the seeds germinate. Just be sure to get your seedlings to a sunny window or under lights within 24 hours of seeing little sprouts emerging through the soil surface.

After germination, most seedlings grow best if the air temperature is below 70 degrees F. If temperatures are too warm (over 75), the seedlings will grow too fast and get weak and leggy. Most seedlings grow fine in air temperatures as low as 50 degrees, as long as soil temperature is maintained at about 65 to 70.

Healthy, hardy beets germinating outdoors

Some seeds can be sown directly in the ground like these beets

 Give them light and warmth and keep them moist, and your seeds will work hard on your behalf. At the risk of repeating myself, the best thing you can do in the garden is to observe your plants.  Keep an eye on them and they’ll let you know if they’re happy.


Mar 022012
 
Spring Garden Made Easy


Finally! Here at last! A streamlined, easy to follow e-book on how to start your spring garden. It covers climate, choosing your site, soil types, what to plant,  compost and irrigation.  After forty years of gardening it’s hard to know what not to share.  In this book I’ve winnowed down the information for novice gardeners to encourage and guide them to successful food growing at home.

Alan Chadwick was a visionary: eccentric, knowledgeable and formidable. He was also my gardening teacher.  He was a master and we were the apprentices, in the old fashioned sense of the word.  We worked long hours, from before the sun rose to sunset.  We learned about seeds, soil, flowers, herbs, fruit and service.  Service to the earth.  Following the laws of nature to ensure healthy, beautiful and bountiful gardens. Always organic, but much more than that, Alan looked deep into the relationships between plants, animals and humans.  My blog and this e-book is the culmination of years of gardening.

Robert Kourik author of  “Your Edible Landscape – Naturally” has this to say:

Avis has condensed over four decades of gardening skill into one information-packed handbook. This is important reading for the beginning gardener. You will skip making many mistakes by reading this attractive handbook first.”

You can buy “The Spring Garden Made Easy” now for only $10, by clicking on the button!

Buy this e-book for the price of a movie. It will be just as entertaining, only without the popcorn.

Those of us who had the privilege of working and studying with Alan now have the obligation to share what we’ve learned.  I hope in this blog, to do just that.  Each topic, a window into a way of working in the garden, simply, carefully and with intention to do no harm. I hope in the e-books that I write, that you can begin to see a little into that world. Of course, the most important part, is the teachings of the gardens themselves.  Open your eyes, ears, nose and mind and learn something new everyday in the garden.

Spring Garden Table of ContentsThe first book, The Spring Garden Made Easy, is aimed at helping you start out, one step at a time to be successful and inspire you to keep going. There will be set backs – snails, earwigs, gophers, deer, they all want a part of your garden. We learn to how to keep them from getting too much and even how to share. Click on the Buy Now button above or on the right side of the web page and you can download it immediately.My hourly consultation is definitely more than $10, which is the cost of the book.  Since I can’t be with all of you in your garden, take this opportunity to pick my brain by buying the book.  Be sure to sign up for the blog as well, it’s free and it’s got lots of information.  I always love to hear from my readers.  Leave me a comment and let me know how your garden grows.In the joy of gardening, Avis

P.S. If you’re reading this in your email, you won’t see the website.  So click on the title and it will take you to all my posts.

Feb 202012
 
Spring flowers

by Avis Licht –

Coffee, especially organic

Drink your morning coffee, then put it in the compost.

Great news for coffee drinkers in the gardening world! Although many people love to drink coffee, it has often gotten a bad rap about its health effects.  Well, I’m here to say that a very reputable source has reported that coffee is very good for your health.  Especially if you’re a woman.  What has this got to do with your garden? Keep on reading!

Here’s what Dr. Sadja Greenwood has to say about coffee in her health blog.

“Positive news about caffeine and coffee is on the rise! Annia Galano, a Cuban chemist, recently published a paper suggesting that coffee is one of the richest sources of healthful antioxidants in the average person’s diet. It scavenges free radicals that can have damaging effects on the body. Here is a summary of recent research.Less Cognitive decline: A study found that women over age 65 who drank over three cups of coffee a day showed less cognitive decline over 4 years than those drinking one cup or less. No such relationship was found for men in this study.(Too bad for you guys.)  Decaf coffee and caffeine alone did not give this protection.” That’s the good news about coffee drinking for us coffee lovers.
The better news about all those extra coffee grounds is that they are fantastic for your garden.
  • They contain nitrogen, and provide generous amounts of phosphorus, potassium, magnesium, and copper.
  • It is a myth that used grounds are highly acidic.  The acid in coffee is reduced by the water when the coffee is brewed.  What’s left is not highly acidic.
  • Grounds are best used in the compost, or mixed into the soil. Don’t use them as a mulch on the surface, as the grounds tend to grow moldy and get hard.
  • Worms love coffee grounds. You can safely put them into your worm bins.

Here’s a link to another article on composting and coffee. It has lots of information:Coffee grounds in the garden.

Spring flowers

Enjoy a cup of coffee while walking around your garden in the morning

Jan 202012
 
Raised beds


By Avis Licht

Raised beds have many advantages.  They  provide better drainage,  better access, better plant growth and reduced soil compaction.  There are many ways to build a raised bed.  Let’s  see what would be best for your garden.

Raised beds

Double dug beds are raised and need no edging

The Simplest Raised Beds

These don’t need any built up edge, they only need to be double dug.

This act of digging and moving the soil aerates it and raises it up. Here’s a more detailed explanation.  This is especially effective when opening up the soil for the first time.    By creating “beds” instead of rows, you leave paths for walking and you never step on the bed.  This prevents compaction and allows water and air to penetrate the soil, making for healthier roots. It also lets you plant in a more intensive manner.

Double digging is hard work, but doesn’t need to be done every season. In another post I’ll show you the many reasons for using this method, and different ways you can incorporate  fertility.

Stone for raised beds

Raised beds using stone for both low and tall walls

Stone Raised Beds

Stone lasts forever, and looks beautiful.  It is also easy to create  curving lines in the garden.

As you can see in the photo above, you can use stone to edge your beds, it defines the line and creates a clear path.You can use it to build a wall, which is especially effective on a slope. In this garden, the curved bed was built to 2 ft high, which helps the owner who has back issues.  We  used the opportunity of the height of the bed to bring in some good organic topsoil.

If you bring in soil, be sure to loosen up the bottom of the bed.  It doesn’t help to bring in good topsoil if you don’t have good drainage.

Cost is a factor in deciding whether or not to use stone.  It can be expensive if you have to buy it, and  it takes time to install it.

buildiing curves with stone is easy

This curved bed looks good even when the garden is dormant

Wood Raised Beds

Wood is commonly used for building raised beds in the vegetable garden. Use recycled wood if possible.  Buying redwood or cedar has many implications to the environment.  If you are only raising the beds a few inches, I don’t think wood is worth the effort or the cost.

If you do use wood, be sure not to use pressure treated wood. This includes old railroad ties. The chemicals in this wood are hazardous to your health and the environment.  This article covers the pros and cons of using wood.

Bamboo raised bed

Bamboo or willow can make a great raised bed, especially if you are growing it yourself

You can even find recycled plastic for raised beds. Kits with all the materials you need can make the project simple.  Gardener’s Supply carries all kinds of raised bed kits.


Raised beds with stone from the site

The raised bed just planted


When deciding whether to use raised beds in your edible landscape consider your site, soil, resources and aesthetics.


Vegetable garden

The raised bed a year later-- vegetables and flowers

Jan 132012
 
sowing seeds

by Avis Licht

sowing seeds

Sowing seeds and germinating in the kitchen window

Seeds, though small in size are a force of nature.  They carry the future in their tiny form. All the information to grow a might oak is in that tiny acorn.  In nature, every seed is slightly different and allows for the possibility of change:  sometimes better, sometimes worse than it’s parent.  Depending on the conditions after sprouting, a seed can grow strong and healthy or be weak. Like a person with a strong immune system, a healthy plant can withstand disease and attack by pests.

Seed packets

Get seed from organic, reputable seed companies


I’m not going to get into a discussion here about hybrid seeds or GMO, but allow me the premise that healthy plants produce healthy seed and it is to your benefit to choose seed from reputable companies that sell healthy, organic seeds.

It is then up to you to make sure you give those seeds the right growing conditions: from the soil you use to plant them, to the sun and warmth for sprouting. In this post you’ll learn how to mix your soil, sow seed, cover it and water it. It sounds simple, and is, but there are a few basic things you can do to assure success.

earthworm castings

Earthworm castings are a wonderful medium for starting seeds

Soilless seed starter medium

Clean, light medium for starting seed is a good idea


1. Choose your seeds: Pick the right plant for your climate it and sow it at the right time. Pick your favorite veggies and see if they are appropriate for your climate and the size of your garden. You can do this by googling your plant, reading seed packets, or talking to your gardening neighbors.  they often have the best information. In the U.S. you can get a lot of information at this site, SmartGardener.com by typing in your zip code.

2.Mix your seed starting medium: Seeds have enough energy in them to germinate and grow their first true leaves.  After that they need some, but not a lot of nutrition in their sprouting medium.  We can call this needing breakfast.  I mix my own compost or earthworm castings in with a medium like the Seed Starter from E.B. Organics. This starter is sphagnum moss, perlite, and gypsum.  It is clean, light and has no real nutrient.  Seeds will germinate and send roots quickly into the medium.  By mixing it with a little compost or earthworm castings you will add “breakfast”.

filled seed containers

Put the seed medium into container and tamp it down.

Seed starting medium - mix it up a little

Mix different materials in a container


3. Sow your seeds on the surface.  In the small six packs (recycled, of course from previous use), I put 2 seeds per section.  In the larger 2 inch pots I put 4 seeds per pot, and in the 4 inch container I put 6 – 8 seeds.  I use the larger pots for quick germinating larger plants, like chard and broccoli. I use the smaller pots for lettuce, spinach,bok choy and smaller plants. Lightly cover the seeds.  The smaller the seed, the less soil on top.  Your seed packet will tell you how deep to cover your seed.

Kitchen window provides sun

In my kitchen greenhouse window I can start seeds early in the season.

4. Lightly water your seeds.  A heavy  flow of water will displace your seeds. Use the lightest setting on your watering wand, a light sprinkling can or a spray bottle.  Be sure that your medium is moist before you put the seed in it.  You want it moist, but not soaking wet. Seeds need to be kept moist until germination.  If they are in the sun, be sure to water them a few times a day.

Broccoli seedlings

Seedlings this size are ready for planting outside

Next step will be how to prepare your garden beds.  We’ll talk about that tomorrow.

You’re ready to grow wonderful, delicious food in your edible landscape. Whether you have pots on the deck, a few square feet, or an entire yard for growing, only do as much as you can happily take care of. Remember, you’re trying to enjoy this project.

the ornamental vegetable garden

A vegetable garden doesn’t have to be square


© 2011-2024 Edible Landscaping Made Easy With Avis Licht All Rights Reserved