Jan 082013
 

by Avis Licht

Every little hair has frost on it.

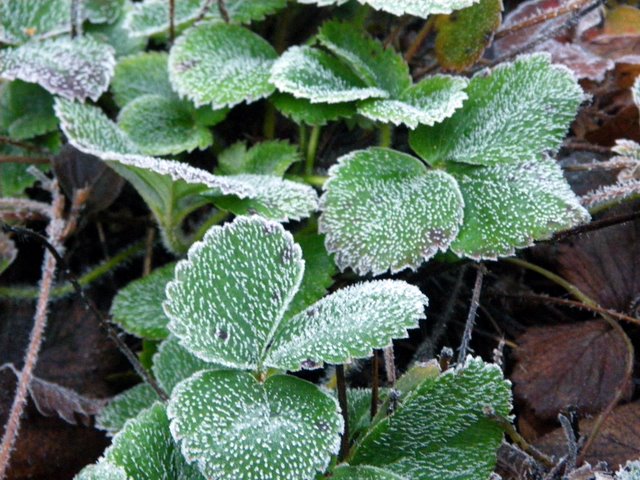
Strawberries with frost

In the middle of a cold and wet winter day it’s hard to think about what needs doing in the garden. But there are a few items on the to do list that will give your garden a jump on  the spring rush.

Be sure to take a walk around the garden and check for erosion from rainy day run off. We’ve had some amazingly strong downpours this year that caused some unwanted waterfalls.  Read these posts to correct drainage problems. Sometimes there’s just too much water at once and you have to clean up after the fact. Take a look at my veggie garden: (click to enlarge)

Protect tender garden plants by covering them on frosty nights. You can use row covers, sheets, blankets or plastic.Succulents, citrus, bougainvillea and fuchsias are among the frost-sensitive plants. Use stakes to keep material from touching foliage and remove the coverings when temperatures rise the next day.

Many deciduous trees, shrubs and vines can be pruned now. Do not prune spring-blooming plants until after they bloom. Consult a pruning guide that lists optimum pruning times for different species.


Order seeds for your spring and summer garden. Read these posts I wrote on catalog offerings and seeds choices. Be sure to order my e book : The Spring Garden Made Easy. It will help you get your garden going in Spring.  It’s only $4.99 and you can download it right now!

It’s perfect timing to plant those hardy perennials during this season of rain and plant dormancy. It’s important to get down to your local nurseries to check out their stock of bare root fruit trees, soft fruit, and more. Think asparagus, artichoke, rhubarb, blueberries, raspberries, pomegranate and all those great fruit trees. Just don’t work the soil when it is too wet.

It won't be long before the spring garden starts to grow.

It won’t be long before the spring garden starts to grow.


Nov 102012
 

by Avis Licht – 

carrots

Beautiful, delicious carrots from a container planting

People who live in urban areas or in apartments often think they can’t grow food. But using planters can be a fun and easy way to grow certain crops.  Containers have their challenges, particularly because of limited soil and need for careful watering and fertilizing.  On the up side, you can put them in small places, in the right light conditions and keep the bugs away. For more on container growing, read this post.

A confession – for two years I haven’t been able to grow any carrots, though I’ve sowed a whole lot of seeds. I prepare the bed carefully, rake and smooth it. Sow it. Water it. Watch and wait.  Sure enough the seeds germinate, I give a victorious shout. The next day I come out and all the seedlings are gone. Some ravenous sow bugs, earwigs, slugs, snails or combination of any or all of the above have managed to decimate my crop. For gardening beginners, this could be very discouraging, especially if an experienced gardener can’t seem to have success.

See those carrots in the photo? Those are mine. I grew them. In a container! Here’s how:

1. Get a pot: clay, wood, plastic or cloth – doesn’t matter.  For carrots, the pot should be 10 -12 inches deep.

Container for planting

A cloth container – use and put it away when you don’t need it. These cloth pots are easy to transport, easy to store: a real plus in urban areas. Find them at this site: Smart Pots.


2. Fill container with planting  medium

Carrot seedlings

A mix of seed starting medium and worm compost.


3. Keep seed moist to germinate, keep pot watered, but not soggy. Thin seedlings: 1/2 -1 inch apart.

Carrots in pot

2 months after sowing, carrots have filled in container and are ready for harvesting


When harvesting, gently separate the greens and look for the largest carrots . Pull them out carefully, making sure not to disturb the neighboring carrots. It wouldn’t hurt to give them a little water after harvesting to settle the roots.

In a 3 gallon size pot (like the one on the left) I will harvest more than 50 small carrots.  They are were incredibly sweet and I had NO bug problems.


Be sure to read more about container planting in this post.  Sign up for an email subscription to this blog so you won’t miss a post.

container grown carrots

Even on tiny decks you can grow fun food. Not only herbs and flowers, but greens, salads and much more.


Nov 052012
 
Delicious and nutritious

by Avis Licht

Delicious and nutritious

A quick way to use those end of season unripe green tomatoes.


At the end of the summer we’re always left with a bunch of unripe tomatoes.  The nights are cold, it rains, the plants start to rot.  It seems like such a shame to lose those tomatoes.  I was looking around the internet and found a number of yummy recipes for green tomatoes.

This recipe is a combination of several good ones. If you have left over sweet peppers you can use them and then add a little cayenne to the recipe to spice it up or down, just the way you like it.

Follow the pictures for each step and the recipe is written out at the bottom of the post.

Be sure to sign up for my blog in the subscription tab at the left.  Put in your email and you’ll receive a notice of my blogs the day I write them. Here’s one on growing tomatoes.

Get your ingredients together to mix with olive oil, salt and a dash of sugar in a medium bowl.


1. Preheat oven to 350 deg F. Chop green tomatoes, onions, peppers and garlic in chunks.

Mix ingredients in bowl before roasting

2. Toss tomatoes, onions, peppers, garlic with olive oil, salt and sugar in a bowl.

ready for roasting

3. Roast in 350 deg oven for about 30 minutes until soft.

roasted veggies

4. Chop your vegetables into small pieces.

Roasted and chopped

Chopped into small pieces

5.Put these veggies into the bowl with avocados, lime juice, salt, chopped cilantro and cumin. Mix well.

Delicious and nutritious

Combine ingredients and add sprig of parsley or cilantro.

There you have it.  40 minutes and you’ve got yourself an incredible dish. Make it spicy hot or not, as you like it. A great way to use those green tomatoes and you don’t even have to fry them!

Here it is:

  • 4 medium green tomatoes
  • 2 small red peppers (hot or not)
  • 1 onion – peeled and chunked
  • 3 – 4 cloves pressed garlic
  • 1 tablespoon olive oil
  • dash salt
  • sprinkle of sugar
  • 2 avocados
  • juice from a lime
  • a little more salt
  • 1/2 teaspoon  ground cumin
  • chopped cilantro – 1/4 cup

1. Preheat oven to 350 deg. Chop tomatoes, onion and pepper and toss with olive oil, salt and sugar.

2. Spread on lined baking tray. Roast for 30 – 35 minutes until softened.

3. Chop vegetables into small pieces.

4. In bowl, smash the avocados, salt, lime juice and mix with chopped vegetables.  Add the cilantro and cumin. Taste for flavor.

5. Enjoy as dip with chips or raw vegetables. My family took care of that bowl in no time.


Oct 302012
 

by Avis Licht

Whether you plant edible crops for the winter or not, there are a few things you can do to keep your garden healthy and protected for the winter.

Clean up under your fruit trees and mulch with compost


1. Clean out the old beds and if you have room, be sure to compost your old foliage.  There are a lot of nutrients in those plants that  came out of your ground and you can put those nutrients back into the soil. Composting is an important part of garden health.


Fava beans make a wonderful winter cover crop


2. Plant cover crops to protect the soil from erosion and add nutrients as well as humus to the soil.  Fava beans and bell beans can be sown even in cold, wet weather.


3. Sheet mulch to cover large areas to improve the soil, get rid of weeds and prepare for future planting without having to dig the soil.  Sound too good to be true? Well it really works. Here’s an article about sheet mulching in my own back yard.


Mulching around plants


4. Mulch the soil around plants. This is one of the most important things you can do in the winter to protect the soil from erosion, hold moisture, protect roots from extreme weather and add nutrient. There are many types of mulch. Leaves, straw, wood chips, compost, and manure are some of the most common and easiest to use. As with everything else in the garden, there’s always lots to learn.  Different mulches  work better in different conditions. Check out my article on best mulching practices.


Frost on fallen leaves

Oct 192012
 
lettuce

by Avis Licht

In Northern California where I live, we can grow many crops over the winter. I’m getting my seedlings in for the Fall and Winter garden.  In this slide show I’m planting lettuce seedlings.  I’ll show you how to gently pry to roots apart and plant them to reduce shock.

Getting the soil ready is an important part of growing healthy plants. In my book The Spring Garden Made Easy, I set forth a simple, straightforward guide to planting that you can use in any season. Check it out!

[portfolio_slideshow]

Using a group of seedlings

Take a clump of seedlings

Gently break apart in half

Gently break apart in half

Open hole and let roots dangle straight down into opening

Open hole and let roots dangle straight down into opening

Firm in gently around the leaves

Firm in gently around the leaves

Water in gently to settle the roots and get the plants going.

Water in gently to settle the roots and get the plants going.

After they are planted you need to make sure they don’t dry out. Check the soil for moisture if it doesn’t rain. Just looking at the surface of the soil doesn’t tell you if it’s moist underneath.  Check with a trowel down a few inches.  If it’s dry at 2 inches or if the plants are wilting, be sure to water them.

You can find out more about extending your season in this article on row covers.

Oct 082012
 

by Avis Licht

Tomatoes, apples, squash

Bring in the harvest from summer to make room for winter crops


The changing seasons in the garden can leave us with  mixed feelings .  The end of the summer season means that we need to clear the beds for the winter garden while it’s still warm enough to plant. The regret is that we have to take out plants that are still producing.

I still have tomatoes, but they are ripening verrrry slowly due to the cold evenings and shorter days. Sadly, I’ll be pulling them out. You can bring in the green tomatoes and they will ripen, though not as perfectly as they did on the vine in the middle of summer.

tomatoes in October

Even cherry tomatoes are slow to ripen in the Fall.

Happily, this will make room for my winter crops, like broccoli, cabbage, cauliflower and lettuce. I’ll be writing about what to grow for winter and how to do it. Be sure to subscribe to my blog so that you can get updates every time I write.


At the Indian Valley College Farm and Garden, the students were busy pulling out the summer crops like cucumbers, beans and squash to make room for the cool weather crops.  They were making wonderful piles of compost.  Layering greens, dry material, manure and water. Nothing goes to waste in the garden.  We may loose a few cucumbers, but gain a lot of compost.


Compost

Starting the compost pile.

Layering compost piles

Take the plants that are done producing and start your compost!


In areas that you won’t be putting in food crops, be sure to cover the ground with cover crops to enhance fertility and protect the soil.  Use fava beans, bell beans, vetch, clover and buckwheat.

direct sow your fava beans

Large seeded plants like beans and peas can go directly into the soil.

Sep 212012
 
4 varieties from one tree
Lots of apples

We love our apples, but they come in all at once. Here are some ways to preserve those apples.

by Avis Licht

Fruit trees are one of the easiest ways to incorporate edible plants into an ornamental landscape.  They flower, they fruit, they’re relatively easy to take care of, they provide shade and beauty BUT they give all their fruit at one time.  One of the biggest complaints I have from my clients is that they don’t want to deal with all the fruit that falls.  Here are a few really easy ways to preserve your harvest.  It’s so worth it.


4 varieties from one tree

Choose apples carefully for storage: no cuts, bruises or bites.

1. The easiest: Cull your fruit for perfect apples that have no worms, cuts, bruises or bites.  These fruits will last for months in a cool, dark place. It’s important to make sure they are perfect or else they will start to rot and cause other apples to go bad.

2. Cut your apples and make applesauce: This is a good way to use “imperfect” fruit.  Cut your apples into slices and remove any bad parts.  I leave on the skins. I add a little fresh lemon juice which adds flavor and keeps the apples from turning brown.  In this batch I used a little Rose water for flavor.  Add a couple of tablespoons water and cook on simmer until the apples are chunky.  Store in the refrigerator up to a week. It is divine.

Cut apples for cooking

Use only a few tablespoons of water and put on simmer until cooked into a chunky sauce. Put in the refrigerator and it will last a week.


rose water

You can find this in Mediterranean food markets.


3. Freeze your fruit:  Put a little lemon juice into your bowl of cut fruit and stir it around.  Put fruit into ziploc bags and throw them into the freezer.  They’ll be ready for pie, sauce or smoothies any time. I wrote a post last Fall on freezing. You can read about it here.

4. Dehydrating fruit: This takes a little more time, but can offer some really tasty treats for later on. This dehydrator is not expensive and is small enough to store when not in use.

Dehydrator

A small scale dehydrator can be used for many fruits and vegetables.

I use fresh lemon juice and mix it with water.  Using a sharp knife I cut the apple in half and remove the core. Slice in 1/4″ layers. Laying the fruit in a shallow dish I put the fruit and lemon juice mixture together.  This keeps the fruit from turning dark and gives it a great flavor.

Juicing lemons

Juice some lemons and mix with a little water.

apples in lemon juice

Cut in 1/4 inch slices and dip in lemon juice


Lay out in trays and let the machine do its thing. Mine took overnight to get most of the moisture out.

Apples in dehydrating tray

Lay out sliced apples.

When done they should be flexible and leathery, but not watery.  Let them cool and put them in ziploc bags in the fridge for storage.  They are really sweet and make a delicious snack for kids.

dried apples

Check your dehydrator periodically to make sure the apples are drying evenly.

5. Share, share and share some more.  Bring your extra fruit and veggies to your local food bank.  They’ll love you and love the food.


Aug 282012
 

by Avis Licht

A ripe Brandywine tomato

There is something very interesting about the green shoulder on this tomato.

It’s often hard to find a ripe, delicious tomato in the store. For that reason, tomatoes are one of the most popular plants to grow in the home vegetable garden. Tomatoes for large scale agriculture have been bred to have tough skins and are picked unripe in order to ship them in large containers without getting squished.  These tomatoes have nothing in common with an old fashioned, well grown tomato, picked ripe.

This blog is not about how to grow a tomato, of which there are many varieties and can be grown in many locales. That’s for another day. What I will talk about  is the meaning of the surprise markings on many heirloom tomatoes.

We usually think about ripe tomatoes in terms of red.  Green means not ripe.  WRONG! The green shoulder on a tomato  influences the amount of sugar in the ripe fruit. If green shoulders don’t sound familiar, that’s because most commercial tomatoes don’t have them anymore. The dark green parts have more chloroplasts, which turn sunlight into sugars. Scientists think that increases the amount of sugar in the tomato by about twenty percent. You can read more about it in this article from UC Davis Food and Science Department.

Many colors and kinds of tomatoes

Tomatoes come in many colors and shapes. They have different flavors as well. It’s worth growing your own.


Watch your tomatoes as they grow, and when they start turning color, whatever color they’re supposed to be, pick them while they’re still a little firm.  If possible hold back on the irrigation before harvesting.  It makes them sweeter.


Pick your tomato carefully

There is a little section near the top of the tomato. Pick it at that section and leave the cap on. The tomato will keep better and you won’t be as likely to rip off the whole branch.


There’s so much to learn about growing the healthiest and best tasting fruit and vegetables, but the most important part is to just start! Let me know what your favorite tomato varieties are.

Aug 232012
 
Pick em ripe

by Avis Licht

String beans and cherry tomatoes are ripe and ready to harvest


As if it isn’t hard enough to grow your food, you also have to figure out when to harvest it.  This may not seem like such a hard thing to do, but there is a big difference in taste and nutritional value when you harvest at the correct time.

It is not always obvious when to pick your veggies.  Here are some tips.

BEANS

Green Beans, whether bush or pole beans are harvested the same.  This green bean is long and slender.  It has not started to puff out where the bean seed will be forming.

green bean ready to pick

Slim, yet juicy, this bean is ready to eat.

Once the bean starts getting rounded, it will be tough to eat and not taste as good. The bumps mean that seed is forming and the plant is getting ready to reproduce.  Check out this photo of the beans side by side.

ripe and over ripe beans

The beans on the left will be tender and juicy. The ones on the right have started to form bean seed and will be tough.

a good bean and a bad bean (well, not bad, but you wouldn't want to eat it)

From this cross section you can see that the bean on the left has not started to form its seed and is tender. The bean on the right will be quite tough. I guess you’ll just have to take my word for it.  Once beans start to produce, they come on fast and furious and it can be hard to keep up with the picking.  It’s a lot like a treasure hunt.  Keep lifting those leaves up and look for your ripe beans.

One reason I really like people to harvest at the right time, is that the taste is so much sweeter.  Kids, in particular are really sensitive to taste and sweetness and we want them to LOVE their veggies.  Come back and find out about tomatoes.  There is some very interesting information I bet you don’t know.

A ripe Brandywine tomato

There is something about the green shoulder on this tomato. Come back to find out what it is.


Jul 312012
 

by Avis Licht

Purslane

Eat your groundcover!

As the saying goes: One man’s trash is another man’s treasure.  And so it is with plants. One woman’s weed is another woman’s favorite food. In the United States we consider Purslane, Portulaca oleracea, to be a weed. But in Europe, Asia, the Middle East and South America it is considered a great food. They eat it fresh and cooked. The stems, leaves and flower buds are all edible. Purslane has more Omega- 3 fatty acids than any other leafy vegetable.  It also has plenty of vitamins and minerals.

I use it in fresh salads, with cucumbers, tomatoes, feta cheese and a little olive oil and vinegar. Soooo good.

In summer it’s too hot for me to grow lettuce as a salad vegetable, but happily I find purslane growing as a ground cover in my vegetable beds: a gift from mother nature.  Just be sure NOT to weed it out of the garden.  We can be a little too tidy sometimes.

Other free plants, sometimes known as weeds, include Lamb’s Quarters, Chenopodium album, and Pigweed, Amaranthus retroflexus.  These wild greens have high nutritional value and taste excellent when harvested at the right time.  Check back to learn more about these guests in your garden.


Here’s what Purslane  looks like in its young form.

Portulaca 2 weeks later

Purslane in planting bed is lush and delicious. This is the same plant as the one on the left, 2 weeks later.

Portulca seedling

Portulca seedling

Jun 132012
 
Edible Flowers

Early summer the flowers of the pineapple guava are beautiful and edible

by Avis Licht – Edible flowers aren’t the usual fare for most people. But I have some favorites that even the most dubious of  eaters would enjoy. The pineapple guava, Feijoa sellowiana, has beautiful as well as delicious flowers. You eat the succulent petals that are almost sweet. Not the red stamens.

I’ve written about Feijoa in another post, talking about the tart and tasty fruit, but now is the time it is flowering in the northern hemisphere, so we’re talking about edible flowers.

How to use Feijoas. The sweet, fleshy white and purplish flower petals can be added to salads. Pluck them carefully and the fruits will still develop. The fruits have a delicious minty-pineapple flavor. Cut them in half and scoop out the pulp with a spoon.

The fruit ripens towards winter and the best fruit drops to the ground when ripe.  If you pick it off the bush it’s likely not to be quite ripe.

Those of you with this shrub in the yard, check out the tasty petals and put them in a salad. The rest of you – go run to the nursery and get one of these amazing plants. I know you won’t regret it.

Get all the information in this post on how to grow the Feijoa.


Pineapple guava flower

Carefully pluck the petals and leave the rest of the flower to make sure you get fruit.

Just to remind you, the Pineapple Guava is an evergreen shrub, that grows to 15 feet if left unpruned.  But you can prune it any way you like. It is easy to care for, doesn’t need much water and best of all around my neighborhood – THE DEER DON’T EAT IT!.  Don’t ask me why, but it’s true.


Jun 082012
 
citronella grass

Grow a natural mosquito deterrent with Citronella grass

by Avis Licht

Many of us gardeners like to sit outside in the evening to enjoy the fragrance and beauty of the garden, only to be attacked by the tiny but insidious mosquito. Here are a couple of plants that you can grow for both beauty and also to repel the mosquitoes.

The term citronella plant applies to both citronella grass (Cymbopogon nardus) and citronella geraniums (Pelargonium citrosum). Both plants boast the insect-repelling aroma but are grown and cared for in slightly different ways. Citronella grass is an ornamental grass that is used commercially to create citronella oil — a potent insect repellent with a lemony aroma. Citronella geraniums, also known as mosquito plants, are hybrid plants that were created by crossing citronella grass with geraniums. These plants release citronella fragrance when they are crushed or rubbed.


1.Citronella grass is a coarse, clump-forming tropical grass that can grow 5-6 ft (1.5-1.8 m) tall. The stems are canelike and the leaves are grayish green, flat, about 3 ft (0.9 m) long and 1 in (2.5 cm) or so wide. It does not spread by runners, as some grasses do, but the clump increases in size as the plant matures. You can find it online at Colonial Creek Farm. This grass is closely related to Lemon Grass (Cymbopogon citratus), which is used in Asian cooking.

Do not rub the citronella grass on your skin. Some people experience a dermatitis with contact. You can crush it and rub it on your clothes. Some folks claim that just growing it in the garden seems to keep the mosquitoes away. I guess you’ve just got to try it for yourself.  At least it will smell good and look good.


Light: Does best in full sun.
Moisture: Citronella grass needs at least 30 in (76 cm) of water a year.
Hardiness: USDA Zones 10 – 12. Citronella grass is perennial in USDA zones 10-12. It needs a long, warm growing season, and may not survive cool, damp winters. Citronella grass usually is replanted anew each spring after the ground has warmed.
Propagation: Propagate citronella grass by dividing the clumps. Do this before winter and keep some of the smaller clumps indoors to insure live plants come spring.

citronella geranium

Scented geraniums are easy to grow - in pots or in the ground

2.Citronella geranium is a drought resistant, tender perennial. It is evergreen in climates above 25 deg F. You can find it at Mountain Valley Growers nursery online. It also makes a great container plant. You can rub this plant on your clothes to repel mosquitoes. I’m not sure about rubbing it directly on your skin.

I happen to love all scented geraniums. They’re easy to grow and when you crush them in your fingers they smell so good.  I use rose scented geraniums in baking.  Yummy!


Flowers for a fundraiser

I picked these flowers this morning. What a great way to spend the morning.

Jun 062012
 
rolling self watering planters


tomato in self watering container

Plants thrive with good moisture in planters


by Avis Licht – When I gave a talk recently on edible landscaping, many people had questions about container planting.  For gardeners with decks, small gardens, or special climate conditions, containers are a simple and easy solution.  However, there are a few tips for helping you grow your plants more successfully. People don’t realize how fast pots dry out and how hard it is to get them moist again.  Once soil has dried out, if you water the pot with a hose, it just runs on through.

Keeping your soil moist is a trick that requires some practice.  Using drip irrigation in your pots, for 3 or 4 minutes 2  or 3 times a day often works.  If you don’t have your pots on an irrigation system try these self watering planters.  They really work!

1. Make sure there’s enough room in the container for root growth of your plants. 

Here are some suggestions for what plants to grow in different size pots.

  •   6″ depth is the minimum – chives, lettuce, radishes, other salad greens, basil, coriander, Asian greens, mint, thyme
  •    12″ for larger veggies – pole beans, carrots, chard, cucumber, eggplant, fennel, leeks, peppers, spinach, parsley, rosemary,beets, broccoli, okra, potatoes, sweet corn, summer squash, dill, lemongrass, bush beans, garlic, kohlrabi, onions,  peas,
  • 18″ -24″  for miniature trees like lemons or limes.
organic tomato fertilizer

From your local nursery or online, find organic fertilizers

2. Use the right soil mix. For self watering planters I suggest you use the mix from Gardener’s Supply formulated just for that.  You’ll need to add nutrition in the form of compost, aged manure, blood meal and other organic fertilizers. The plants rely on you 100% for their nutrition. Be sure to feed them.  Read up on what your plants need and add it to the potting soil. Using foliar feeding or a liquid fertilizer like seaweed solution works well.Don’t just put soil from the garden into your pots.  It will be too heavy and dry out easily.


3. Place the planters where they will get the best light and be protected from wind or blasting hot sun. Gardener’s Supply even has self watering planters that have castors on them so you can move them around to catch the changing light and heat conditions.

rolling self watering planters

Pots can look good and be easy to move

Jun 012012
 

Save 15% off on $50 or more at Gardener’s Supply Company! Valid thru 6/28/12
[really-simple-share]

Thinning clumps of apples

This is a cluster of fruit from one node.

by Avis Licht- It’s always hard to throw away fruit, whether it’s on the tree or in the kitchen. But for best flavor, health and size of apples, be sure to thin them early in the season. You should do this for pears, peaches and plums also. Here’s how to do it.

1.Fruit is usually born in clusters of 2 – 6 fruit.  When they are small, around the size of a dime, cut out the smallest, damaged, misshapen, or wrinkled fruit.


2. Carefully prune out the fruit at the base of the stem. Use a sharp clipper or scissors.

Thinning the little apples

Clip carefully.


3.Be sure to leave one good apple.

Thin to one apple

Leave one apple per cluster.


That’s all there is to it.  Now you have to be patient until it’s time to harvest.

Here’s an easy, delicious recipe for apple crisp.

Going out into the garden to pick fruit is a really sweet thing to do.  You can be sure the fruit is fresh, organic, and ripe.  I needed something really quick to bring to a family gathering.  So I stepped out into the garden and picked a bowl of strawberries, a bowl of blackberries and some wonderfully tart apples.

Apples, blackberries and strawberries from the edible gardenBeautiful fruit right from the garden (click to enlarge)

All I had to do was rinse them off, slice the apples and put them in the pan.  If you want you can squeeze a little lemon juice over the apples.  I didn’t have any, and no harm was done. I confess to sprinkling a tiny bit of sugar over the top of the fruit.

The next step is the crumble for the top.  You can use a variety of ingredients.  I use 1/4 cup rolled oats, 1/4 cup  flour, both whole wheat and white, 1/4 cup  sugar mixed in with 1/4 cup butter and a pinch of salt. A little cinnamon and nutmeg goes well with this. Mix these ingredients over the top and voila, you’re ready to go.  Thirty minutes in 350 deg oven and you will have the best crisp you’ve ever tasted.

Special ingredients for the best apple crisp

May 242012
 
June in the Northern California Garden

Water, feed and stake up your plants before they fall over.

by Avis Licht

With the warm sun on our backs we can heave a sigh of relief that the winter is over. The Summer Solstice is the longest day of the year and we can expect some spectacular days ahead of us.

Your plants will be growing fast now. Irrigation coupled with warm weather can produce excess growth that is attractive to unwanted critters, like snails and slugs.


• IRRIGATION

In many places early summer is the time to start some serious watering in the garden. If you’re lucky to have summer rains, be sure to check the soil for moisture.  Windy days and hot sun can really take the moisture out of the plants and the soil.

I still recommend checking your soil with a trowel to be sure it is neither too dry nor too wet. Just looking at the surface, does NOT tell you what ‘s going on underneath.

For those of you who would like to learn more about putting in an excellent irrigation system I recommend Robert Kourik’s book, Drip Irrigation for Every Landscape and All Climates. You can find this book and others he has written on his website:

www.Robert-Kourik.com

• CRITTER CONTROL

Snails and slugs are in abundance due to all the moisture and spring growth. Controlling these guys organically can be tricky. They come out at night when it’s cool and moist. You can go out with a flashlight and see exactly who’s doing what to whom. At this point you can hand pick them off the plants. (This is not the most frequently chosen method around these parts.) You can also collect your eggshells in a can, and then crumble them around your plants. The snails don’t like the sharp edges of the shells and won’t crawl over them. You can also use Slug Magic, a product found in nurseries that has the main ingredient of Iron Phosphate which kills them. This is considered a safe and organic method of getting rid of snails and slugs. You can find this from Gardener’s Supply.

gopher trap

Effective and safe for handling. It will kill your gopher quickly

Another pesky critter is the gopher. You will notice their presence by raised mounds of soil. Gophers tunnel underground and push the soil up. They can and will eat roots and stems, killing your plants quickly and easily. I’ve had entire broccoli plants pulled under into the tunnels. Traps, either metal or wood can be set into the tunnels. It means digging into the soil and putting a trap facing in both directions of the tunnel. Only those not afraid of pulling out a dead gopher should try this. this trap is called a Victor Box trap.  You can get it through Amazon.

A preventive measure is to put mesh wire, called hardware clothe, in the soil. It can go under a bed of vegetables or in the hole where you are putting a bush or shrub. This is an initial investment of time and money, but lasts for years and protects your plants.

Of course, there are many more pesky critters, but to keep this post short and readable, I’ll save them for another day. Stay tuned for how to cope with aphids, deer, raccoons and more.
•TIP OF THE DAY

A wilting plant may be just that, not because the soil dry but because a mole or gopher may have tunneled near the roots and exposed them to the air, which dries the plant. Check for these critters and fill the holes around the roots.

Be sure to add fresh mulch to the garden. This will preserve moisture and help the soil. It will help keep your plants happy and healthy.

Edible Patio

The edible landscape is ready for summer entertaining


© 2011-2024 Edible Landscaping Made Easy With Avis Licht All Rights Reserved